Wednesday, August 24, 2016

Making Wood Vegetable Chopping Bowls From Boards and Little Pieces

My first two wood bowls were small and required removing a lot of material from inside and outside of short, solid cylinders. For family and friends I wanted to make a series of much larger bowls to make chopping garlic, onions and other vegetables less messy than using knives and flat cutting boards. Very large chunks of clear wood appropriate for cutting bowls are not readily available. 

Gluing together flat boards that have been cut into rings that together form a rough bowl allows one to use many kinds of kiln-dried lumber. Judiciously cutting the outsides and insides of a large disc at a 45 degree angle enables the small inside disc become another layer. In these bowls, the disc cut from the inside of layer four becomes layer two and the bottom layer comes from layer three.
Scroll Saw Setup with Table at 45 Degrees Here Making the Inside Cut of Layer Four
Closeup of Saw Blade Cutting on the Pencil Line
Four Bowl Levels Are Made from Two Yellow Birch Discs: Top View
Rear Discs Make Layers Two and Four. Front Discs Make Bottom  and Third Layers
Stacked Solid Discs on Left, Bowl Mockup  on Right
Gluing Four Layers Together
Rear View Showing Bowl Glued to Sacrificial Plywood Mounted to Lathe
Front View Roughing Out Bowl Inside
Top Ring Alternating Cherry and Walnut Wood Trapezoids Being Glued Together
Top View During Final Sanding
Rear View Prior to Splitting Off the Plywood Mount
Bottom View of Finished Bowl with Chopping Knife and
Leather Sheath
Bowls require a chopping implement with a curve that has an equal or smaller radius than the bowl inside. An ordinary knife doesn't work. I cut the blade blank from a sheet of 0.060 inch stainless steel and polished it with buffing compounds. The handle is carved and sanded cherry. The wings of the leather sheath hit the handles so the blade doesn't cut the lacing that holds the two sides together. 

Bowl Inside View
For an earlier bowl I made a chopping implement that had two handles with slots that rotated around so they covered the blade. I don't know which I prefer because they accompanied bowls that are now on the west coast. I have blanks cut but harvesting and processing vegetables is keeping me from finishing them.
Chopping Implement with Handles That Cover the Blade When Not in Use
My First Chopping Bowl with the "Dee" Handled Chopper Showing Its Radius Smaller Than the Bowl. The Bowl Rim Has Cherry Trapezoids and Is Not As Fancy As Later Bowls
The Second Chopping Bowl Also Used Cherry Trapezoids But Had Narrow Pine Strips to Delineate Them


Wednesday, August 17, 2016

Turning Segmented Wood: Making Beads-of-Courage Vessels

Every year the Beads-of-Courage (http://www.beadsofcourage.org/) program provides 60,000 sick children in 250 hospitals beads for every procedure they have to endure. They start out stringing these beads together but too often they have so many that they need a container to hold them all. The organization asks woodworkers create fancy boxes to hold beads. In March I made a vessel using flat boards
My First Beads of Courage Vessel With Rings Made Out of Two Flat Boards
I recently joined a group of woodworkers learning to make round objects using segments. The technique uses triangles or trapezoids glued together to form rings that are stacked to make bowls, vases, urns and similar cylindrical forms. By incorporating different colors of wood, these creations can be extraordinary. The pieces of wood are typically arranged so that grain is tangent to the circumference of these round forms. Tools then shave nice ribbons when slicing along the grain. When making a ring from a solid board, only two small parts cut along the grain the rest becomes more difficult as more and more wood fibers have to be cut at up to 90 degrees. Cutting tools often pull bits of fiber out of the wood that require more sandpaper and effort to finish.

Three additional vessels use twelve trapezoids that have 15 degree angles on each end to create five or six rings. The upper and lower rings of the cylinder are walnut and the three layers that make up the top alternate cherry, walnut and soft maple. The sides of the vessels utilize either soft maple or birch dowels, lined with clear formed polycarbonate sheet. Knobs (actually rejected wine stopper handles) were turned from lilac. In contrast to the first vessel that used two pieces of wood, the solid cylinders use 74 pieces, not counting knobs.
Views: Inside Lids and Solid Cylinder Bottoms
Views: Inside Vessels and Tops 
Stepped and Blended Three Ring Tops on Vessels
Three Rings Glued Together Make the Tops
The Vessel With Clear Sides Supported by Six Dowels
View Showing Inside the Lid and Open Vessel
View Showing Maple Bottom and Inside Lid with Pine Ring That
Centers the Lid on the Vessel Opening


Sunday, August 7, 2016

Hiking Food: No-Bake Vegetable Crackers

I plan a long hike with one of my daughters this fall. Rather than bring commercial processed food I hope to primarily eat food we collected or grew locally. Last month I made ten sheets of fruit leather using our raspberries, gooseberries and apple sauce. Next steps: energy bars and crackers.
Raspberry, Gooseberry and Applesauce Fruit Leather
I found a recipe that added together a variety of raw minced herbs and vegetables that are spread on sheets and dehydrated. Rather than follow the suggested ingredients, using a food processor I pureed 14 cups of summer squash, two cups of garlic, two onions, four cups of boiled chestnuts and a cup of fresh basil/oregano leaves. I then added a cup of olive oil and three cups of flaxseed ground with an ounce of dehydrated hot peppers into a crumbly paste using a Corona flour mill. After thoroughly blending all these ingredients together, using an icing spatula, I spread this paste in 3/16 inch thick layers on nine 14 inch square non-stick sheets on wire rack shelves in our dehydrator.

Raw Ingredients for Vegetable Crackers: Summer Squash, Garlic Cloves, Onions and Boiled Chestnuts (from Freezer)
Onions and Garlic in the Food Processor, Pureed Squash in the Bowl, Ground Flax Seeds and Dried Pepper in the Square Container
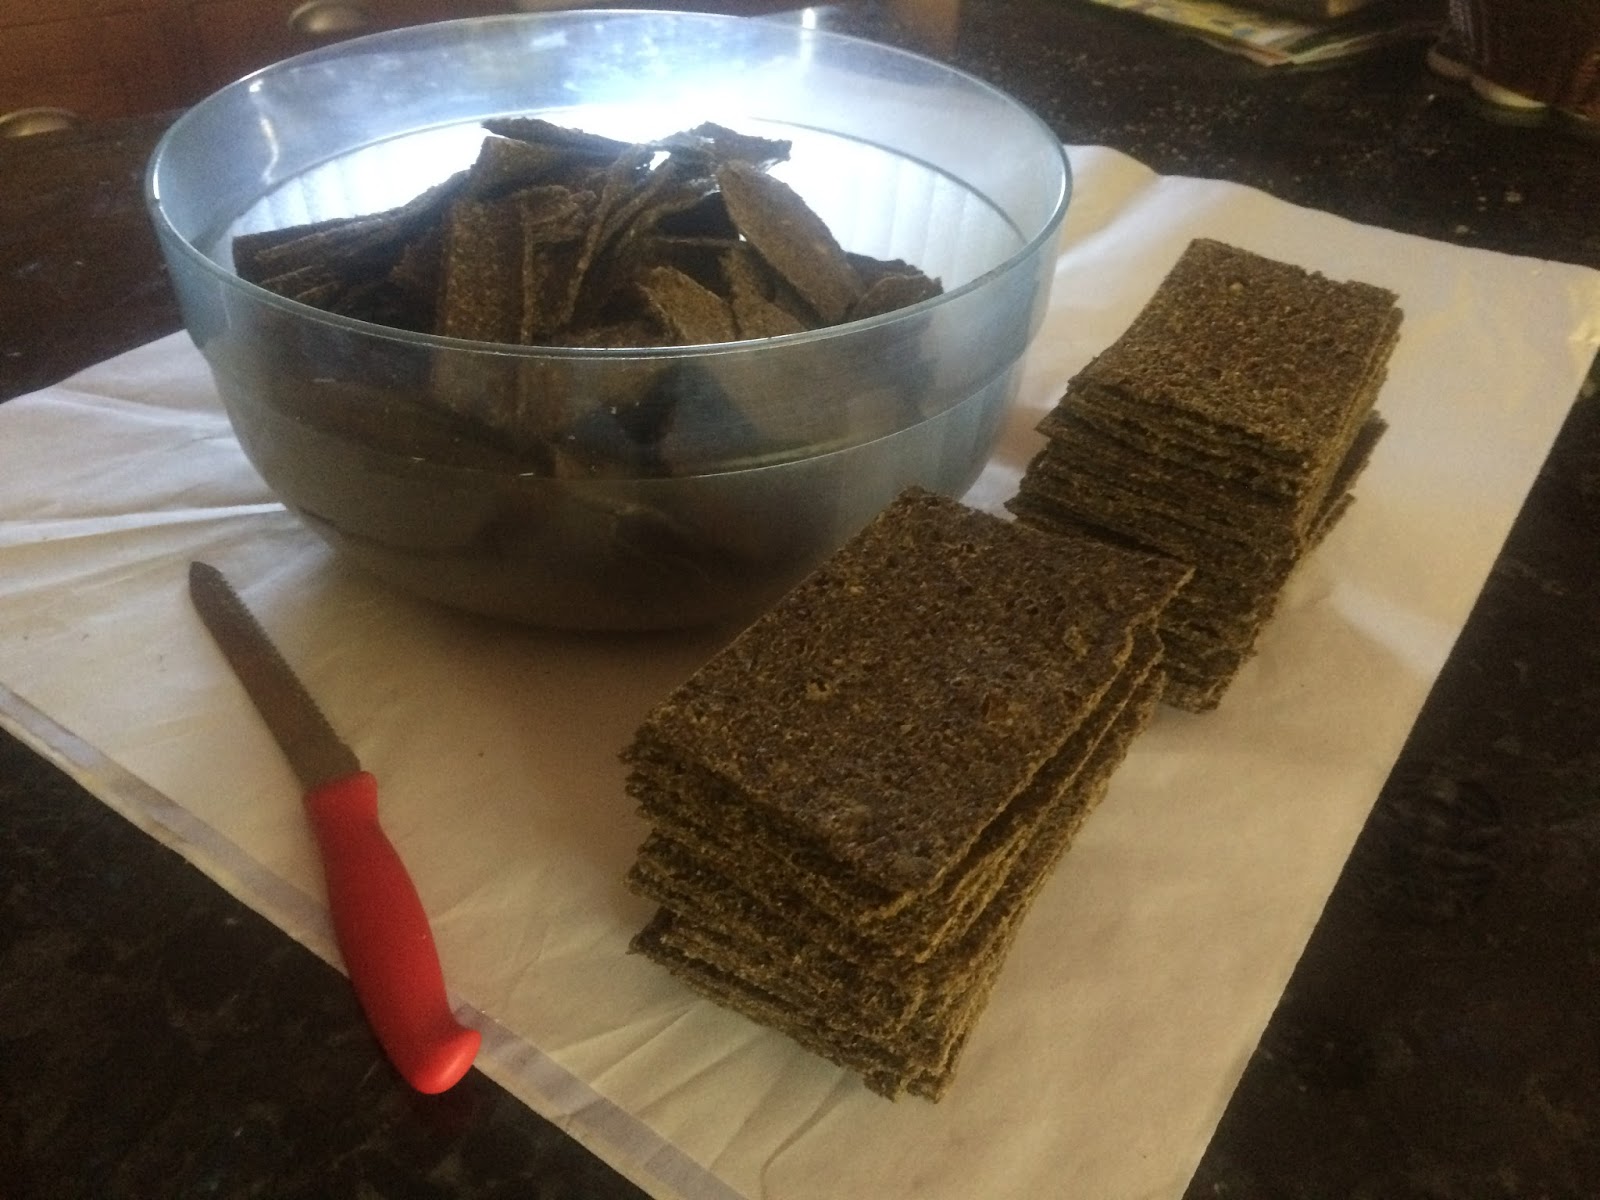
After 12 hours at 125F, the still sticky bottom of these sheets of vegetable paste peeled easily away from the teflon-coated fabric. With dry sides now resting on the wire racks, these sheets dried another 8 hours.  The result: three pounds of firm sheets that were easily subdivided using a serrated knife. I trimmed off the edges that curled up and make them into chips. The central portions became flat 3" x 4.5" crackers.
Sheets of "Vegetable Leather" That Will Become Chips and Crackers
Bowl of Vegetable Chips and Stacks of Crackeers
These crackers taste pretty good, though sprinkling salt makes them taste even better. What's next? Try versions with tomato paste, kale and a much higher ratio of boiled chestnuts. One goal: a great no-bake pizza cracker! Maybe by adding cheese and pepperoni to the above?

Friday, August 5, 2016

Flowers: 2016

Although I prefer to tend vegetables, I do supply my wife with hundreds of flowers in pots that she plants in her raised beds and borders. She saves some seeds from the showiest varieties but orders quite a few packets of new ones every year. Along with our vegetable seeds, I start her flowers in flats and then transplant single plants in their own pots, most often yoghurt cups. When the threat of frost is over, I often prepare her soil and distribute mulch while she plants. She chooses where each variety goes and avoids planting annuals where they grew the year before.
Russian Iris
Yellow Iris, Blue Spiderwort and Red Peony, with White Peony in Background
Hollyhocks
Black-eyed SusanRudbeckia fulgida, with Smooth Leaves
Black-eyed SusanRudbeckia hirta, with Hairy Leaves
Pink Phlox, Red Zinnias and Orange Day Lilies with Yellow Black-Eyed Susan in the Background
Because so many of our flowers are perennials or sprout in the beds and paths from seed all by themselves, managing beds is much more haphazard than planting vegetables. Many of our base flowers have been growing in the same places for decades: phlox, peonies, lavender, bleeding heart, lilies, tulips, bee balm, butterfly weed, lilies of the valley, spiderwort and hostas. Some of these like to expand their territory and have to be kept in check. Others readily volunteer and often have to be moved, given away or discarded: violets, lupine, marigold, black-eyed Susan, forget-me-nots and hollyhocks. Over the years, colors sometimes fade  and we start over. 
Wild Blue Lupine: Food for Karner Blue Butterfly
Bleeding Heart
Foxglove
Cultivated Lupine Comes in Many, Many Color Combinations
Marigold
Yellow and Red Snapdragons on Left, Black-Eyed Susan on Right
Purple Statice for Dried Flower Arrangements
Day Lilies
Evening Primrose
Indoor Flower Arrangement: Destination for Many Blooms
Very Dark Red Sunflowers

Sunday, July 31, 2016

Rainy Day: Perfect for Bottling Cider

We welcomed rain today: the first real rain we've received all summer. Today is the first day in the four months I've been logging rainfall that the gage recorded more than an inch! When that happens, the central tube fills to the top and lets the overflow bleed into the surrounding volume. Tomorrow morning I'll have to add this extra rain to 1.00 inches to obtain the total. 
Siphoning Dark Hoppy Cider Into a Bucket So Maple Syrup Can be Added Without Disturbing the Layer of Yeast on the Bottom of the Carboy
Decanting Clear Apple Cider That Has Fermented 10 Months
When it's pouring is a perfect time to bottle cider. I chose to siphon both a carboy of hard hoppy apple cider, that also had some brown sugar added to make it around 9% alcohol, and one of pure apple juice, now 6% still cider. I added 11 ounces of maple syrup to each four gallon batch to carbonate these drinks in their bottles. It will take a month or so for the yeast to convert the sugar in the syrup into the carbon dioxide that makes the bubbles.
Illustrating the Color of the Pure Apple Cider 
Basement Shelf Holds 35 Bottles of the Hoppy Cider (Left) and 37 Bottles of Plain Cider

Tuesday, July 26, 2016

Guinea Fowl Tragedy

Early this morning a neighbor pulled into our driveway, walked back along the road, and came back holding a Guinea fowl that was very still. He had hit it with his truck, while trying to avoid it. It was the father of some of our 18 keets and the other four of his flock wandered around all day calling for him.
Our Guinea Fowl Died in an Accident with a Truck
The flock often doesn't settle on their roosts until well after dark but tonight they were all inside the chicken tractor two hours before dusk, behavior that never happened before! We don't let food go to waste and roasted this bird with potatoes. He was a bit tough, for he was full grown when we got him a year and a half ago. This is the first time we've eaten Guinea fowl and were surprised that all his meat was dark, with lots of sinew. But I like chewing on bones and enjoyed every bite, thanking our very friendly fowl for his time with us.

Guinea Fowl Ready for Roasting
His decedents are doing well, growing like weeds. I spend time with each of the 18 two times every day so they get used to being handled and are not afraid when I call or speak to them. I hold each until they no longer struggle or peep. They are slowly getting much calmer.
Our Keets, Now 10 Days Old, Though "Pipsqueek"in Front Is a Bit Less Than a Week Old