Monday, December 19, 2016

Weird Cardinal Encounter

This morning, on my way to filling the bird feeder, I noticed a cardinal who seemed frozen on the deck. He was beautiful so I captured a few photos from a foot or two away. Five minuted later he was still frozen (temperature was 15F). Ten minutes later, he was gone! Did he fly away? Or did something eat him? No sign of feathers anywhere! Did he have a seizure?
"Frozen" Cardinal, Photo Taken from Around a Foot Away
Second Photo, as Above
Third Photo, as Above


Friday, November 18, 2016

Final Tally: Bean Tunnel

 Harvesting dry beans is relaxing. They take their time to dehydrate and even if their shells mold or discolor, bean seeds inside turn ever more brilliant. Frost typically kills late bloomers and seeds in later pods don't fully develop. This year's bean tunnel produced a little over two pounds of immature fruit that chickens and Guinea fowl heartily devoured. Some years we don't get around to pick the drying bean pods until December but I was anxious to quantify this year's production a bit earlier. Shelling them took about three hours.
Scarlet Runner and Purple Pod Beans Hanging to Dry
The two dozen purple pole bean plants produced around 30 pounds of fresh string beans but we let most of them mature and dry so that we now have two pounds of seeds for years to come. Any that don't get planted will become soup.
Purple Pod Pole Bean Seeds
Scarlet runner beans we grow primarily for show because the fresh large pods are tough to eat. The beans inside are beautiful and the four dozen plants produced five pounds of these shiny gems.
Scarlet Runner Bean Seeds
The real champions in producing food this year were the Italian Zucchino Rampicante squash (Baker Creek Heirloom Seeds). Not only did they produce immature fruit from early August through October totaling over 200 pounds, the four squash allowed to mature for seeds together weighed over 25 pounds! These now are the color of butternut squash and will probably cook up like winter squash. Maybe we'll make a pie with a small piece of one for Thanksgiving dinner!
Mature Italian Zucchini, Formerly a Pale, Splotchy Green
We did plant some cucumbers but they produced little edible fruit. Opposite the cukes were beautifully red yard-long beans but we didn't know when to pick them nor did we have recipes for preparing them. We fed seeds that birds didn't steal to our fowl. In another part of the garden we had planted sweet potato squash and they taste exceptional and are quite beautiful. They earned a section in next year's bean tunnel.
Sweet Potato Squash: Some Are Dirty From Growing on the Ground

Wednesday, November 16, 2016

Planting Garlic

I have been too busy to get our garlic in the ground before my target date: October 31. In September, a family member helped separate the best 350 cloves from heads but they sat in a carton waiting to complete harvesting, a birthday celebration, a hike and a quick visit to both west coast daughters. A dear friend planted almost half while we were away for two weeks that enabled me to plant the rest in only a few hours.
Garlic Cloves Going into Rows with Hay Fork, Bucket for Worms and Carton of Separated Cloves
My favorite tool for planting is a hay fork because its skinny tines slip so easily in our soft soil and don't often hurt the worms that are so plentiful. Most of the worms, grubs and caterpillars end up in a pail for transport to the chickens and Guinea fowl. The garlic beds get covered with a few inches of ground up leaves and grass for insulation and weed/moisture control. By next June, most of this organic matter will have been processed by worms so that the bed is ready for parsley seeds.

Tuesday, October 11, 2016

Happy to Find a Wood Turtle

I've lived in rural upstate New York since 1973 and typically spend some time outdoors every day. I've seen plenty of painted turtles and snapping turtles but never a wood turtle. I grew up in eastern Pennsylvania, about 150 miles south of here, and spent thousands of hours with my brother hunting and documenting snakes and turtles. Wood turtles were the most common reptile we came across there, especially in spring when they congregate in streams looking for mates.

This past weekend my wife spotted a wood turtle walking down the road in front of our home. Spending time on pavement is not safe for any animal so I relocated him to the most remote pond edge near here, far from roads and fields that get periodic tractor visits. 
Mature Wood Turtle with a Stub Left Front Leg
Front View: Wood Turtle
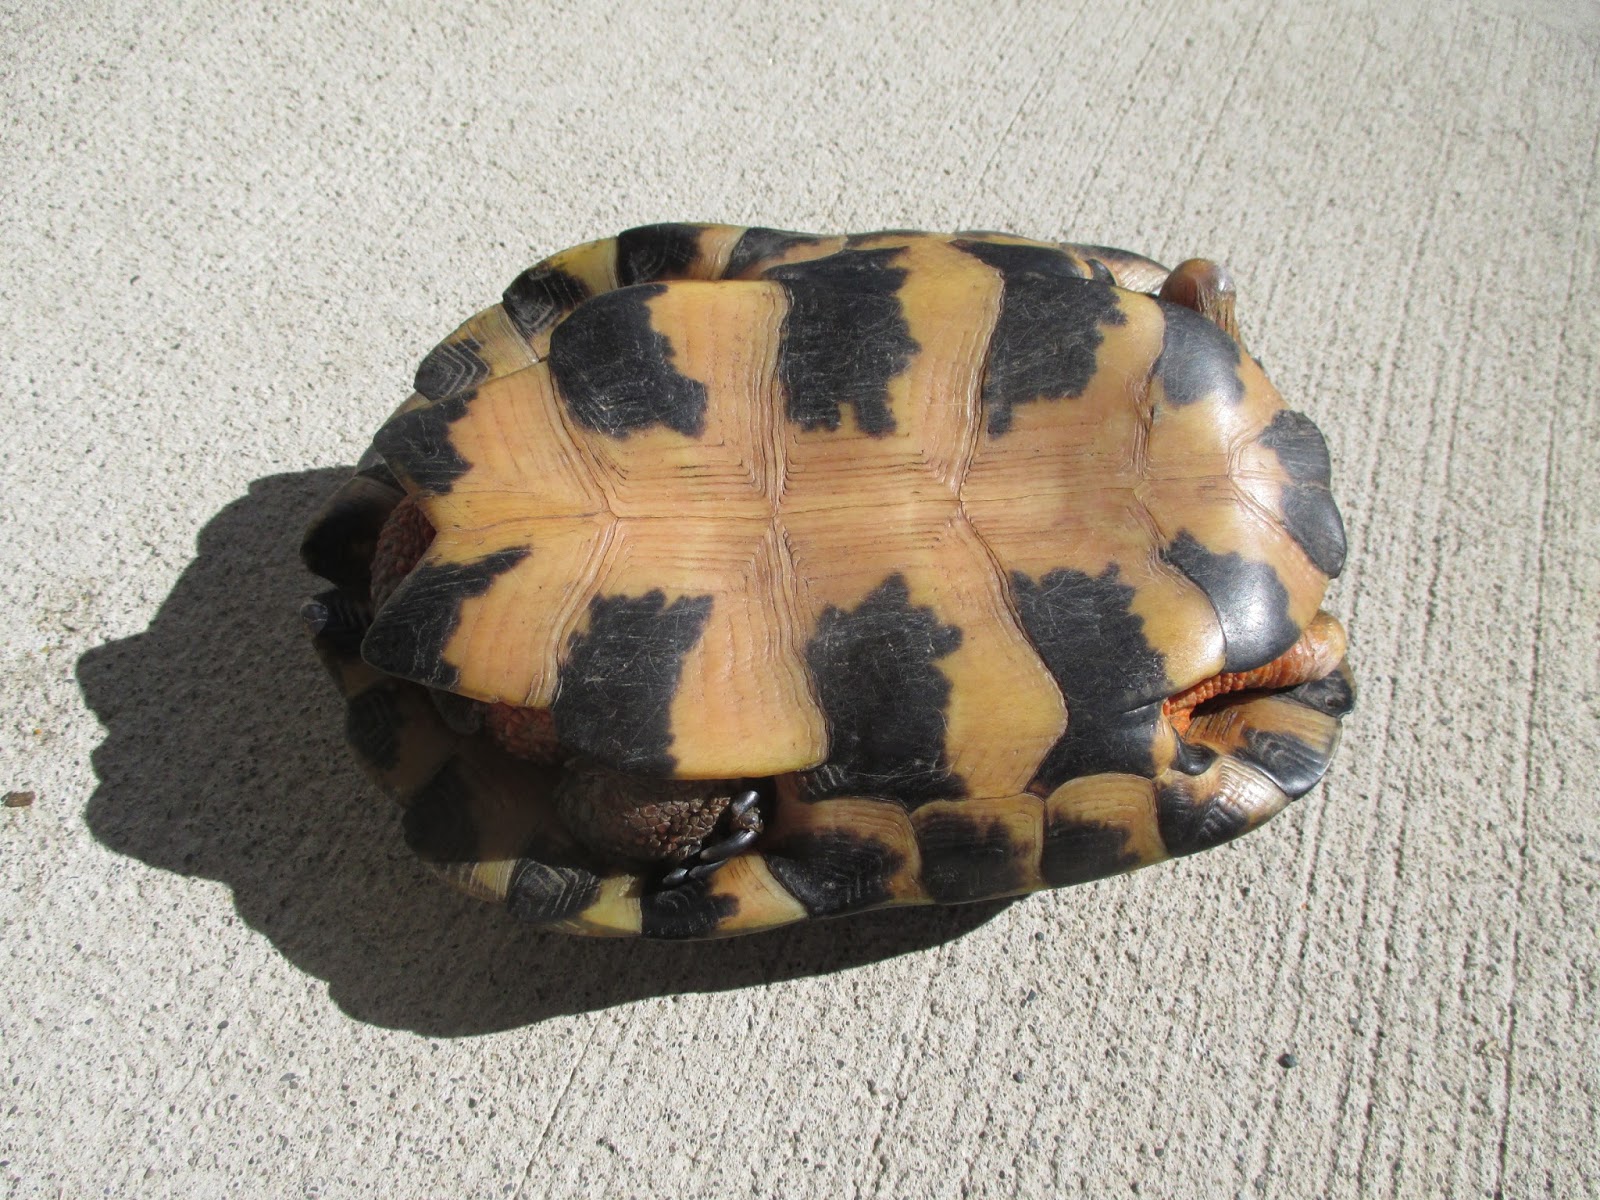
Wood Turtle Bottom View Showing Plastron and Two Stub Front Legs
This fellow sported two front leg stumps where some animal, long ago, chewed off his paws. They healed well and he's able to get around pushing hard with his fully intact rear legs. Judging from the rings on his scutes, the shield-shaped patterns on his shell, he's at least 20 years old. His plastron, the bottom part of a turtle shell - opposite the carapacewas concave indicating he is a male since females need more space to hold eggs inside, requiring a convex plastron.

Box turtles were the second most common land turtle in eastern Pennsylvania and I've never seen one of these here either. They were my favorite because they can close up tightly and protect both sets of legs. I also had one for a pet that I hand fed and she followed me around our yard for years. Now I am hoping to find a box turtle!

Tuesday, September 27, 2016

Bean Tunnel: Growing Four Months

By July, bean and squash seeds planted along the edges of the bean tunnel had grown a foot tall with some flowers. This first week of autumn has already given us two light frosts, killing tender ground hugging squash leaves. In the meantime we've harvested a few hundred pounds of squash and many meals of fresh string beans. We are letting most of the beans dry for use as seeds and soup.

 One very neat aspect of the Italian Zucchini variety we tried is that they become a winter squash with a hard shell when they mature. We're letting a few turn butternut squash color so that we can harvest their seeds when we try them mid winter. This variety has been remarkably productive, way beyond any other we've tried. Now, in late September, a dozen plants are still producing more than 50 pounds per week. A few vines have wilted leaves from insect/viral damage but most are still healthy with vines growing longer. They have avoided frost damage by climbing high on the trellis that raises them above the coldest air near the ground. 
Tender Young Squash Leaves Shriveled by Frost: September 23
July 11: Beans and Squash Starting to Flower
August: Vines Reaching the Top 
Purple Pole Beans Producing a Bumper Crop!
Most of the Chinese Yard Long Beans Hang Low Outside
One Week's Production of Zucchino Rampicante
Italian Zucchini Hanging Down, Making It Difficult to Drive the Tractor Through
Squash Behind Purple Beans
More Italian Zucchinis
Italian Squash Fruito Becoming a Hard Shelled Winter Squash

Monday, August 29, 2016

Making Italian Squash Chips

After many iterations making vegetable chips, we succeeded in making some that are as good as any commercial chips. My brother gave me the recipe, lent me his food slicer and four batches later I'm an expert. It takes less than an hour to slice five long Zucchino Rampicante squash (Baker Creek Heirloom Seeds) into discs, marinade them in a mixture of:

  1. 1/2 cup of pureed garlic
  2. 3 Tablespoons of olive oil
  3. Tablespoons of cumin
  4. Tablespoon of smoked paprika
  5. 1/2 teaspoon of cayenne
  6. Tablespoons of lemon juice
  7. (optional) 1 Tablespoon of turmeric
102 Ounces of Zucchino Rampicante Squash
The Electric Toastmaster Food Slicer Processed Five Squash in 10 Minutes!
and arrange them on dehydrator sheets. Disc thickness that worked best for me: 1/8 inch. Insure each squash chip is covered in spice and place closely-packed on teflon or silicone sheets on dehydrator trays. I tried placing chips directly on grates but they tend to wrap themselves around the wire - although they do make fancy fluted chips that way (that don't pack well). Dry for 8 hours at 115 F and then flip each one and dry another two hours, or more if they are not yet very crisp. After removing the stem and blossom scar, 100 ounces of fresh squash made 8 ounces of crisp chips! They lost 92% that was water! Both thickness and diameter were greatly reduced so the flat chips easily pack into a quart zip-lock bag.
Close-packed Squash Slices on Teflon Sheet
Same Sheet as Above, After Drying 8 Hours
Another Sheet Before Drying
Same Sheet After Drying


Sunday, August 28, 2016

Making Tomato Paste and Soup Stock

We grow more than a hundred tomato plants so we have enough for us and lots to share. That way, when tomatoes come in, we have plenty when we want to process what we need for the year. All winter we make weekly batches of soup that require two or three quarts of stock to soften up dry beans. That requires at least 60 quarts and we only had 11 left from last year. 
This Harvest Required Four Trugs of Tomatoes
The Squeezo Separates Skin and Seeds from Tomato Juice and Pulp
We use a Squeezo hand-cranked food processor that delivers firm tomato seeds and skin after passing through the machine twice. We add lots of garlic and basil ground up in a food processor to the tomato puree. In a large heated pot, tomato juice separates from the pulp fills a colander as it tries to float on the mixture. To keep the colander from sinking we use a ladle to bail the clear liquid into quart jars until it no longer flows into the colander. Boiling it away would take huge amounts of energy and take a very long time. This way, each batch takes only about an hour. Canning seven quarts of tomato paste and stock in our steam (not pressure) canner takes about a half hour. So 41 quarts required six batches.
Tomato Soup Stock Always Includes a Bit of Tomato Pulp That Sinks
Two Days of Picking/Processing: 14 Quarts of Tomato Sauce, 27 Quarts of Stock
We still need a few dozen quarts of tomato stock but we have to make ketchup and salsa that make even better flavored soup stock!

Wednesday, August 24, 2016

Making Wood Vegetable Chopping Bowls From Boards and Little Pieces

My first two wood bowls were small and required removing a lot of material from inside and outside of short, solid cylinders. For family and friends I wanted to make a series of much larger bowls to make chopping garlic, onions and other vegetables less messy than using knives and flat cutting boards. Very large chunks of clear wood appropriate for cutting bowls are not readily available. 

Gluing together flat boards that have been cut into rings that together form a rough bowl allows one to use many kinds of kiln-dried lumber. Judiciously cutting the outsides and insides of a large disc at a 45 degree angle enables the small inside disc become another layer. In these bowls, the disc cut from the inside of layer four becomes layer two and the bottom layer comes from layer three.
Scroll Saw Setup with Table at 45 Degrees Here Making the Inside Cut of Layer Four
Closeup of Saw Blade Cutting on the Pencil Line
Four Bowl Levels Are Made from Two Yellow Birch Discs: Top View
Rear Discs Make Layers Two and Four. Front Discs Make Bottom  and Third Layers
Stacked Solid Discs on Left, Bowl Mockup  on Right
Gluing Four Layers Together
Rear View Showing Bowl Glued to Sacrificial Plywood Mounted to Lathe
Front View Roughing Out Bowl Inside
Top Ring Alternating Cherry and Walnut Wood Trapezoids Being Glued Together
Top View During Final Sanding
Rear View Prior to Splitting Off the Plywood Mount
Bottom View of Finished Bowl with Chopping Knife and
Leather Sheath
Bowls require a chopping implement with a curve that has an equal or smaller radius than the bowl inside. An ordinary knife doesn't work. I cut the blade blank from a sheet of 0.060 inch stainless steel and polished it with buffing compounds. The handle is carved and sanded cherry. The wings of the leather sheath hit the handles so the blade doesn't cut the lacing that holds the two sides together. 

Bowl Inside View
For an earlier bowl I made a chopping implement that had two handles with slots that rotated around so they covered the blade. I don't know which I prefer because they accompanied bowls that are now on the west coast. I have blanks cut but harvesting and processing vegetables is keeping me from finishing them.
Chopping Implement with Handles That Cover the Blade When Not in Use
My First Chopping Bowl with the "Dee" Handled Chopper Showing Its Radius Smaller Than the Bowl. The Bowl Rim Has Cherry Trapezoids and Is Not As Fancy As Later Bowls
The Second Chopping Bowl Also Used Cherry Trapezoids But Had Narrow Pine Strips to Delineate Them


Wednesday, August 17, 2016

Turning Segmented Wood: Making Beads-of-Courage Vessels

Every year the Beads-of-Courage (http://www.beadsofcourage.org/) program provides 60,000 sick children in 250 hospitals beads for every procedure they have to endure. They start out stringing these beads together but too often they have so many that they need a container to hold them all. The organization asks woodworkers create fancy boxes to hold beads. In March I made a vessel using flat boards
My First Beads of Courage Vessel With Rings Made Out of Two Flat Boards
I recently joined a group of woodworkers learning to make round objects using segments. The technique uses triangles or trapezoids glued together to form rings that are stacked to make bowls, vases, urns and similar cylindrical forms. By incorporating different colors of wood, these creations can be extraordinary. The pieces of wood are typically arranged so that grain is tangent to the circumference of these round forms. Tools then shave nice ribbons when slicing along the grain. When making a ring from a solid board, only two small parts cut along the grain the rest becomes more difficult as more and more wood fibers have to be cut at up to 90 degrees. Cutting tools often pull bits of fiber out of the wood that require more sandpaper and effort to finish.

Three additional vessels use twelve trapezoids that have 15 degree angles on each end to create five or six rings. The upper and lower rings of the cylinder are walnut and the three layers that make up the top alternate cherry, walnut and soft maple. The sides of the vessels utilize either soft maple or birch dowels, lined with clear formed polycarbonate sheet. Knobs (actually rejected wine stopper handles) were turned from lilac. In contrast to the first vessel that used two pieces of wood, the solid cylinders use 74 pieces, not counting knobs.
Views: Inside Lids and Solid Cylinder Bottoms
Views: Inside Vessels and Tops 
Stepped and Blended Three Ring Tops on Vessels
Three Rings Glued Together Make the Tops
The Vessel With Clear Sides Supported by Six Dowels
View Showing Inside the Lid and Open Vessel
View Showing Maple Bottom and Inside Lid with Pine Ring That
Centers the Lid on the Vessel Opening