Showing posts with label canning. Show all posts

Sunday, September 10, 2017

Processing Tomatoes

Summer has been cool so tomatoes are ripening later than usual. We plant about 100 tomato plants so that we can process what we need in large batches. We share early and later harvests when there are fewer. This year we were running low on soup stock, tomato sauce and ketchup so tackled replenishing these.
Floradade Tomatoes Ripening Nicely But Leaves Drying Up
Super Roma Tomatoes Producing Well But Leaves Also Withering
Sauce Tomatoes: 2017
We use a Squeezo food processor to separate tomato pulp from seeds and skin. It takes a whole day each to pick a few bushels of tomatoes, manually grind them through the Squeezo, decant and preserve the "tomato plasma", add spices to the sauce and ketchup and can them, clean the equipment and feed what we don't use to the Guinea fowl. This year's totals: 22 quarts of tomato sauce, 31 pints of ketchup and 65 quarts of soup stock. 

Squeezo Processor With Sliced Tomatoes Placed in Funnel, Juice and Pulp Slide Down the Chute and Seeds/skin Comes Out the End

Squeezo Closeup From a Different Angle

Bowl Full of Tomato Skins and Seeds But With Some Pulp

Second Squeezing of Above, Now Much Drier and a Third the Volume
It takes only half an hour to cook these because we separate the plasma from the pulp using a colander which we try to float in the sauce. To keep it from sinking, we bail out the clear liquid that leaks through the holes in the colander. This process does steal some of the garlic, onion and basil flavors from the sauce  but delivers them in the soup stock. We make the ketchup after separating the plasma so that soup stock is pure tomato juice.
The Colander We Found That Works Best for Bailing Soup Stock from Sauce
We use a canning technique that uses a small amount of water in a pan covered by a jar support plate with holes. When the water boils, steam envelopes the jars and exits through two small holes in the lid. We steam these acidic products for 15 minutes once steam exits the lid. 
Canning Technique Where Water Boils under the Plate that Holds the Jars and the Cover Traps Steam to Envelop the Jars.

Difference: Ladled the Left Quart While Tomato Sauce Was Boiling. Right Ladled Out of the Colander With No Boiling (Steam Bubbles Pumps Some Pulp Through the Colander Holes)  

First Batch (18 Quart Pot) of Soup Stock and Tomato Paste (5:3 Ratio)

First Batch of Soup Stock and Ketchup (12 Quarts: 12 Pints or 2:1 Because Vinegar Is Added to Make Ketchup)


Sunday, August 28, 2016

Making Tomato Paste and Soup Stock

We grow more than a hundred tomato plants so we have enough for us and lots to share. That way, when tomatoes come in, we have plenty when we want to process what we need for the year. All winter we make weekly batches of soup that require two or three quarts of stock to soften up dry beans. That requires at least 60 quarts and we only had 11 left from last year. 
This Harvest Required Four Trugs of Tomatoes
The Squeezo Separates Skin and Seeds from Tomato Juice and Pulp
We use a Squeezo hand-cranked food processor that delivers firm tomato seeds and skin after passing through the machine twice. We add lots of garlic and basil ground up in a food processor to the tomato puree. In a large heated pot, tomato juice separates from the pulp fills a colander as it tries to float on the mixture. To keep the colander from sinking we use a ladle to bail the clear liquid into quart jars until it no longer flows into the colander. Boiling it away would take huge amounts of energy and take a very long time. This way, each batch takes only about an hour. Canning seven quarts of tomato paste and stock in our steam (not pressure) canner takes about a half hour. So 41 quarts required six batches.
Tomato Soup Stock Always Includes a Bit of Tomato Pulp That Sinks
Two Days of Picking/Processing: 14 Quarts of Tomato Sauce, 27 Quarts of Stock
We still need a few dozen quarts of tomato stock but we have to make ketchup and salsa that make even better flavored soup stock!

Thursday, July 7, 2016

Making Raspberry Jam

Our raspberries ripen before currents, gooseberries, blackberries and blueberries. We enjoy adding jams to various cake and pastries and that made from pure raspberries is our favorite. Jam and jellies for sandwiches tolerate mixing whatever fruit are ripe as does juice concentrate that we use year round for beverages.

Raspberries Ready for Picking
Two heavy rains put a very welcome end to an extended dry period that prevented berries from growing to normal size. Our earliest raspberries are tiny but those following are normal size to large. Our first picking yielded 8 cups of juice through our "Squeezo" processor that removes more than half the raspberry seeds. Small seeds get through the sieve. This amount made two batches of jam: six each 12 ounce jars and four half pints.
Raspberries Ready for Processing
This "Squeezo" Separates Juice and Pulp from Solids, Like Seeds and Stems.
Yield: Six 12 Ounce Jars and Four 8 Ounce Jars of Raspberry Jam


Tuesday, November 17, 2015

Saving Food: Apples, Cabbages, Peppers and Beans

It's November 17 and we still have a few dozen bushels of great tasting apples on four Granny Smith trees. 
One of Four Granny Smith Apple Tree Without Leaves But with Hundreds of Apples
We've given away many bushels, dehydrated more and have quite a few bushels waiting for processing. The few heavy frosts we've had haven't touched them. It's hard for me to see them go to waste, though they do help deer and other wildlife thrive. We have a year's supply of applesauce canned and 30 gallons of cider brewing or bottled but have run out of brewing vessels. Every few days I slice and dehydrate 40 or so apples into two gallons of chips. I'll probably pick another ten bushels before they freeze and store them under cover in the garage where I dehydrate them. When it gets way below freezing, they and the dehydrator will need to be transferred to the basement. 
Gallon Bags of Dehydrated Apple Slices and Other Drying Experiments
Three 5-gallon Carboys & Two 6-gallon Pails of Juice Fermenting 
Cabbages did not fair as well as the apples. I had to trim off the top leaves that were damaged by frost. The rest of the heads were still very crisp and hopefully will turn into great sauerkraut (white cabbage) and kimchi (red cabbage). The kimchi also has a few pounds each of garlic and sweet and jalapeƱo peppers mixed in for flavor. We have a total of seven gallons of these raw veggies slowing fermenting in the garage to extend their time to maturity while we eat more than a dozen fresh cabbage heads and pounds of peppers.
A Few Red Cabbages with Top Leaves Trimmed Off
Cross Section of A Red Cabbage
Five and Three Gallon Crocks Filled with Fermenting Cabbage and Other Veggies. Tops Are Weighing Down Plates That Keep Veggies Submerged in Brine.

Beans are easier to preserve than fruits and vegetables that have to be cut, shredded or squeezed. They simply have to be shelled and spread out to dry. Peppers, too, can be hung out to dry, and look good in one corner of the kitchen. Need a little heat in a dish? Pull one off and crumble it into the pot!

Scarlet Runner Beans in Various States of Drying
A Ristra of Alice's Favorite Hot Pepper (from a fellow seed saver) Hanging Out to Dry


Tuesday, September 22, 2015

JalapeƱo Pepper Jelly!

A Few Pounds of Hot Peppers
Someone I follow on Twitter posted a recipe for an interesting Cranberry-Pepper Jelly (Hot). A most interesting aspect: suspending a whole pepper in each jar of clear red jelly! But the recipe had one problem: it only made three half pint jars. I like to fill our vessel when canning to save energy and also make the work worthwhile. Why make three when it's just as easy to make 15 jars?
15 Jars of Hot JalapeƱo Pepper Jelly
Two Quarts of Currant Juice
We have a bumper crop of hot peppers so collecting enough for this recipe was easy. I selected 16 bright red peppers that were too big to fit the small canning jars and chopped them, seeds and all, in our food processor. I added the mash to two quarts of currant juice that we canned a few months ago because currants are tart and red as cranberries and I didn't have to go to a store and get cranberry juice cocktail. After adding 12 ounces of homemade apple cider I simmered it for 15 minutes before straining out the pepper bits. To the now clear liquid I added 10 cups of sugar, two packages of SureJell Fruit Pectin (@1.75 oz.) and a bunch of pretty ripe peppers. 
Making JalapeƱo Jelly by Sterilizing Whole Peppers in the Currant Juice/ Sugar Mixture
After boiling the mixture for 15 minutes, I filled 16 jars and stacked them in the steam canner. After steaming for 15 minutes, I tightened the rings on their tops and let them cool. All tops "popped" indicating they are vacuum sealed.
Jars, Filled With Jelly and Pepper, Ready to Be Steamed
The remaining peppers will soon be processed using another recipe I came across: Cowboy Candy (Candied JalapeƱos). The Currant/JalapeƱo Jelly jelled within ten minutes and tastes terrific! Not too hot, but very exciting!

Peppers That Didn't Make It Into the Jelly
Currant/JalapeƱo Jelly Recipe:
32, or so, JalapeƱo Peppers
2 Quarts of Currant Juice (or Cranberry Juice Cocktail)
1.5 Cups Apple Cider Vinegar
10 Cups Sugar
2 Packages of SureJell Fruit Pectin (or other jelling agent)

1. Chop the ugly half of the peppers in a food processor (or by hand), with or without seeds (that have most of the heat). 

2. Boil chopped peppers in the juice/cider mixture for 15 minutes and then separate using a strainer.

3. Add the sugar and pectin and when dissolved, add the good looking peppers, and cook for 15 minutes.

4. Ladle into jelly jars with one pepper in each, tip up (so stem doesn't get under the lid seal).

5. Steam for 15 minutes with lid rings loose.

6. Tighten the rings while hot to create the vacuum that "pops" the lids.

7. Label, with date.

Wednesday, September 2, 2015

Processing Tomatoes

We grow almost 200 tomato plants in two separate gardens. This year we are trying six varieties and not saving tomato seeds so each section has more than one variety. When we save seeds, we grow only a few types and isolate each variety to keep the seed pure and less likely crossing with another. This time of year this many plants deliver a few bushels of ripe fruit each week that we share with family, friends and neighbors. We also deliver 40 to 100 pounds each week to a local shelter.
The "Squeezo" Separates Tomato Skins and Seeds from Pulp and Juice. We Put the Skins and Seeds Through Twice to Maximize Yield and Dry the Dregs for the Chickens.
Hand Cranked Food Processor with Interested Dog, Cupcake.
This week was our turn to process ripe tomatoes. We separate the juice and pulp from the seeds and skin using the same "Squeezo" food processor that we use for apples. We add lots of garlic, basil, oregano, and hot peppers (Serrano this time) and let boil for half an hour. 
Tomatillos, Serrano and Sweet Peppers We Added to Flavor the Tomatoes
On top of the bubbling puree we then float a metal colander with small holes so we can ladle out most of the clear liquid. We preserve this in quart jars for soup stock that we use to reconstitute dry beans during cold months. It takes three or four quarts to make a large pot of soup using a pound each of dry beans and frozen sweet corn. We usually add hot turkey sausage and any fresh vegetables available. The wood stove in the kitchen is hot or warm from October to April since it heats our home so it's no trouble to slowly cook soup for eight hours, or so, every week. 
Metal Colander Floating on Top of Cooking Tomato Sauce That Facilitates Ladling Out Tomato Plasma to Thicken It.
Tomatoes processed this way make twice as much soup stock (flavored tomato plasma) as it does thick sauce that we use for pasta or pizza.

Day One: Nine Quarts of Thick Tomato Sauce and 19 Quarts of Soup Stock, That Have Various Amounts of Tomato/Flavoring Solids. Fewer Bits and Pieces Go Through the Holes in the Colander As the Sauce Thickens. 
Day Two: Five Quarts and One Pint of Tomato Sauce, 11 Quarts of Soup Stock On Top of the Stove We'll Use for Cooking All Winter.

Monday, August 24, 2015

Processing Apples

Anticipating the largest apple harvest in over a decade, I modified an exercise bicycle so that I can grind up apples by pedaling with my feet, while cutting up the apples by hand and removing bad parts. We pick apples for eating and those used for pies and baked goods, but it takes too long to pick the dozens of bushels ripening this year. We need a way to squeeze the juice out of apples we pick off the ground that's quick and easy. Adding a second shaft to the exercise bike makes it easy to change the gear ratio between the pedals and the drum that grinds fruit. If it's easy to do, make the drum turn faster than you pedal. If it's difficult, gear it down.
Exercise Bike Closeup Showing Intermediate Shaft That Allows the End Drive to Rise Well Above the Pedals and an Easy Way to Change Gear Ratio.
The drum I chose came from an auction many years ago and is welded to a shaft, all stainless steel. The drum has grooves that quickly grind up apples but then fill up and require lots of hand work to continue working. I tried different thickness plates for the drum to mash apples against, but all three didn't change throughput. They all took a lot of work to enable it to continue mashing apples.
View of Drum Showing Grooves Filled With Mashed Apples
The Pedal-powered Apple Masher Showing Processing Table and Feeding Chute but Not a 5-Gallon Pail that Receives the Mashed Apple
Once you have many pails filled with ground up apples, there is the task of separating the juice from the rest. I built a conventional slat-lined cylinder that I hoped would let liquid quickly flow down to a tray that emptied into a bucket. I used a 12 ton hydraulic press to push on a tightly fitted piston. The first quart came out very quickly but then slowed way down until almost nothing more came out. Even with many additional tons of pressure on the top, very little cider came out the open strips between the slats. With over 5 gallons of mash in the cylinder, less than a gallon seeped out in 14 hours, periodically pumping the hydraulic ram. It seems that the volumes of pulp near the openings between the slats quickly drained away and blocked liquid from the interior from getting through.
Hydraulic Press with Oak Slat Cylinder Filled with Apple Mash and Pressed for 14 Hours. Only Material Near the Openings Lost Liquid, the Rest Was As Wet As It Went In.
 I searched Craig's List for options and found an ancient grape crusher for $50 available two hours away. I brought it home, disassembled and cleaned it, but decided it would take a few days to both connect it for pedal power and also modify it. The two drums that rotate at different speeds are open at each end and were filled with dried grape stems, seeds and skins. These need to be sealed so they can be readily cleaned without disassembly.  
Top View of a Fruit Crusher. The Two Drums Rotate At Different Speeds So They Clean Each Other.
Side View of Fruit Crusher Showing Drive Handle and Spring Loading Mechanism That Pushes One Drum Against the Other.
My goals for the weekend were to start five-gallons of apple cider fermenting and to make a large batch of apple sauce. The quickest way to do both is to use a squeezer that separates pulp from skins, stems and cores. 
"Squeezo" Fruit Grinder That Separates Apple Peel, Stems and Cores From Pulp/Juice.
To remove the apple bits from the juice I made five platens that had hollow cores and tops with lots of holes that allowed juice to flow unimpeded. A gallon of apple pulp was loaded into a frame lined with a piece of cloth ten times the size of the platen. After folding over all sides of the cloth, the frame was removed and another platen placed on top and the process repeated. Once the five sandwiches of platens and wrapped apple pumice were complete, it took only ten minutes of pushing slightly on the hydraulic press to turn the layers of apple to moist fruit leather. It took two pressings using five 5-gallon pails of apples to make five gallons of cider.
Hydraulic Press With Receiving Tray, Five Platens, and a Frame for Holding a Cloth While Filling with Two Inches of Apple Pulp. The Cloth Is Folded Over in Every Direction and the Frame Removed. When All Layers are Complete, A Solid Plate Is Placed on Top and the Stack Compressed by the Hydraulic Cylinder. The Juice Flows Into the White Tray on the Bottom and Drains out a Hole into a Bucket on the Ground.
I had to process about eight more gallons of apples to make enough juice to make three gallons of moist fruit leather into proper consistency apple sauce. Cleanup took only a few minutes to rinse the metal parts in water. The cloths were folded, placed in a plastic bag and frozen until next batch. After adding some sugar and cinnamon, the processed apples made 30 pint jars of applesauce.
Next Year's Supply of Apple Sauce.

Friday, September 26, 2014

Tomato Harvest

Most years we’ve grown an assortment of tomatoes to establish which ones work out best, but this year we planted two kinds: 96 plants of “Bears”, a plum variety for making sauce and a half dozen “Grape” tomatoes, for all-around eating. Last year “Bears” out produced three other plumb tomato finalists and they did not disappoint us this year. Most fruits are perfect, with not one with blossom end rot or splits. Though not their fault, a few (1 – 2%) did get damaged by birds, rodents and tomato hornworms but this was hardly noticeable. We had more than ample rain throughout the summer but unusually cool weather slowed tomato growth so ripening really began in September, two weeks later than the last few years.

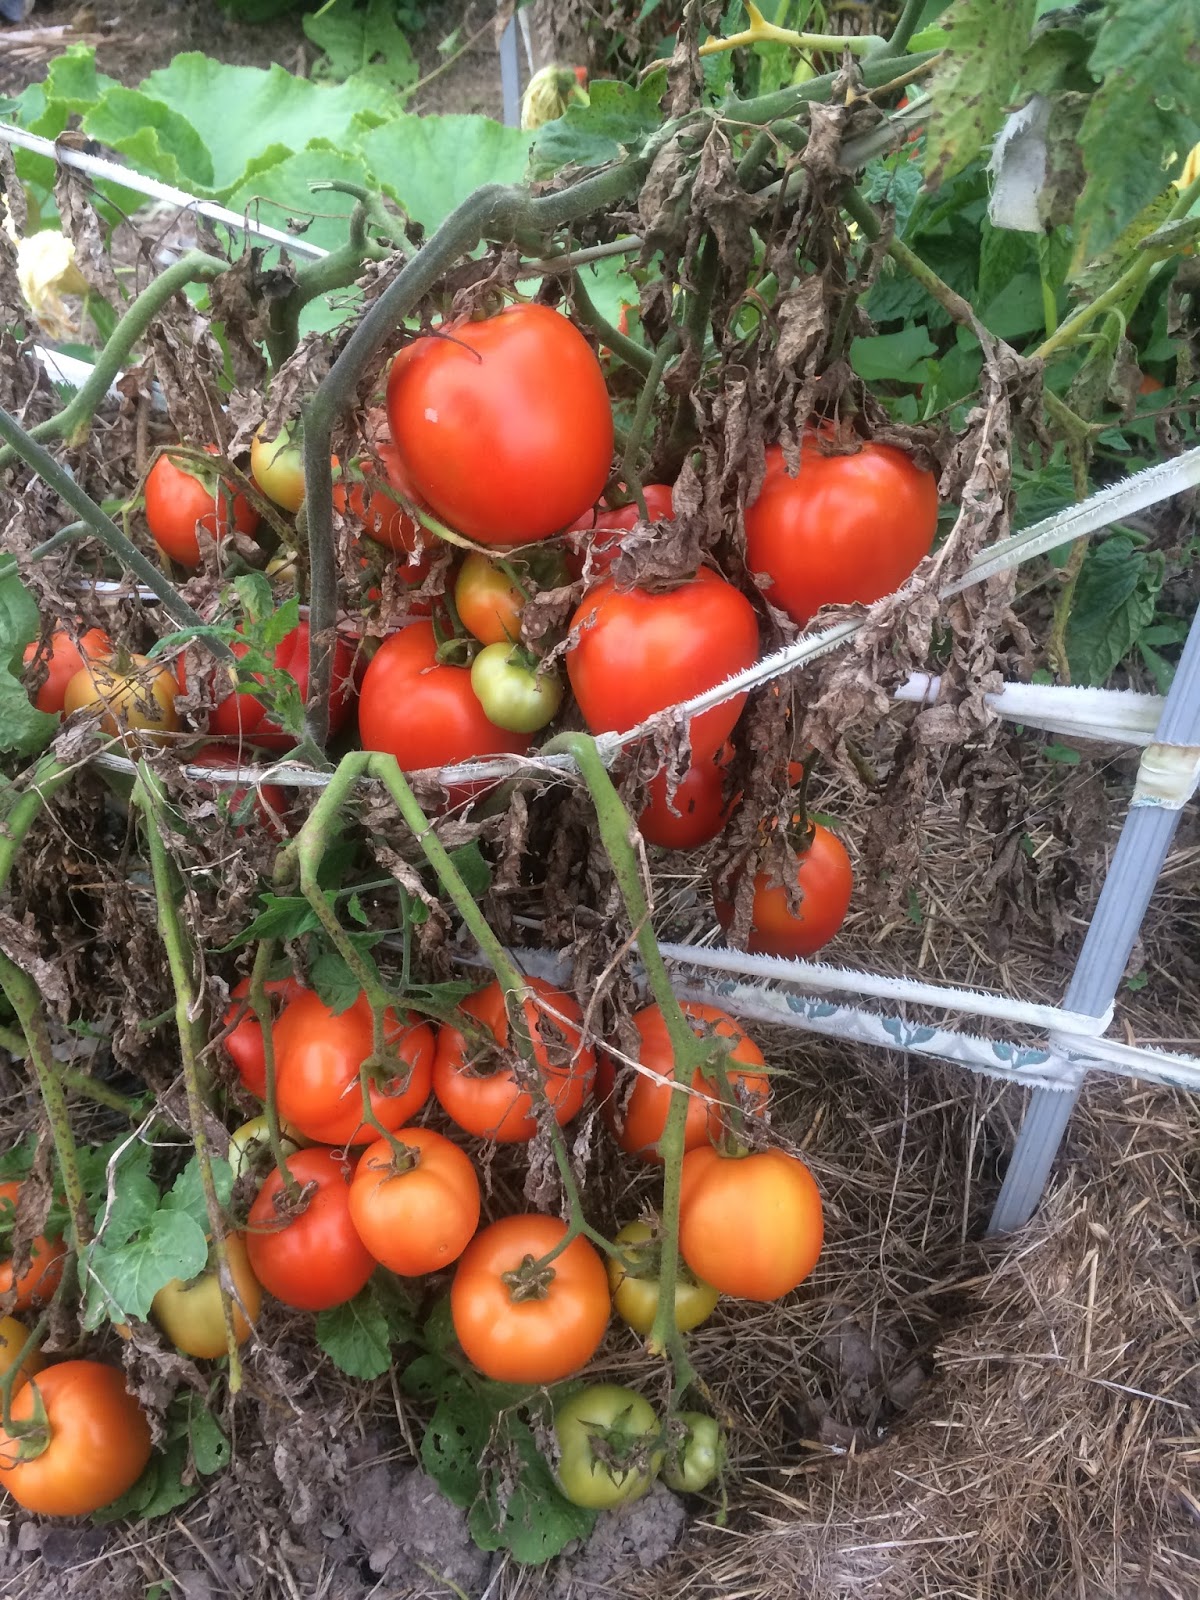
Figure 1: Plum Tomato Plants in September Woven Between Stakes
As described in an earlier posting, we grow our tomatoes among rows of aluminum stakes. It takes only a few minutes per row to weave strips of cloth torn from old sheets to interconnect these six foot long poles with the growing tomato plants. This year it took seven sessions of weaving (every week or so starting in June) to bind the ever taller plants so no vines touch the ground (Figure 1) or block paths between rows.
Figure 2: 240 Pounds of "Bears" Plum Tomatoes (and a Tomatillo)
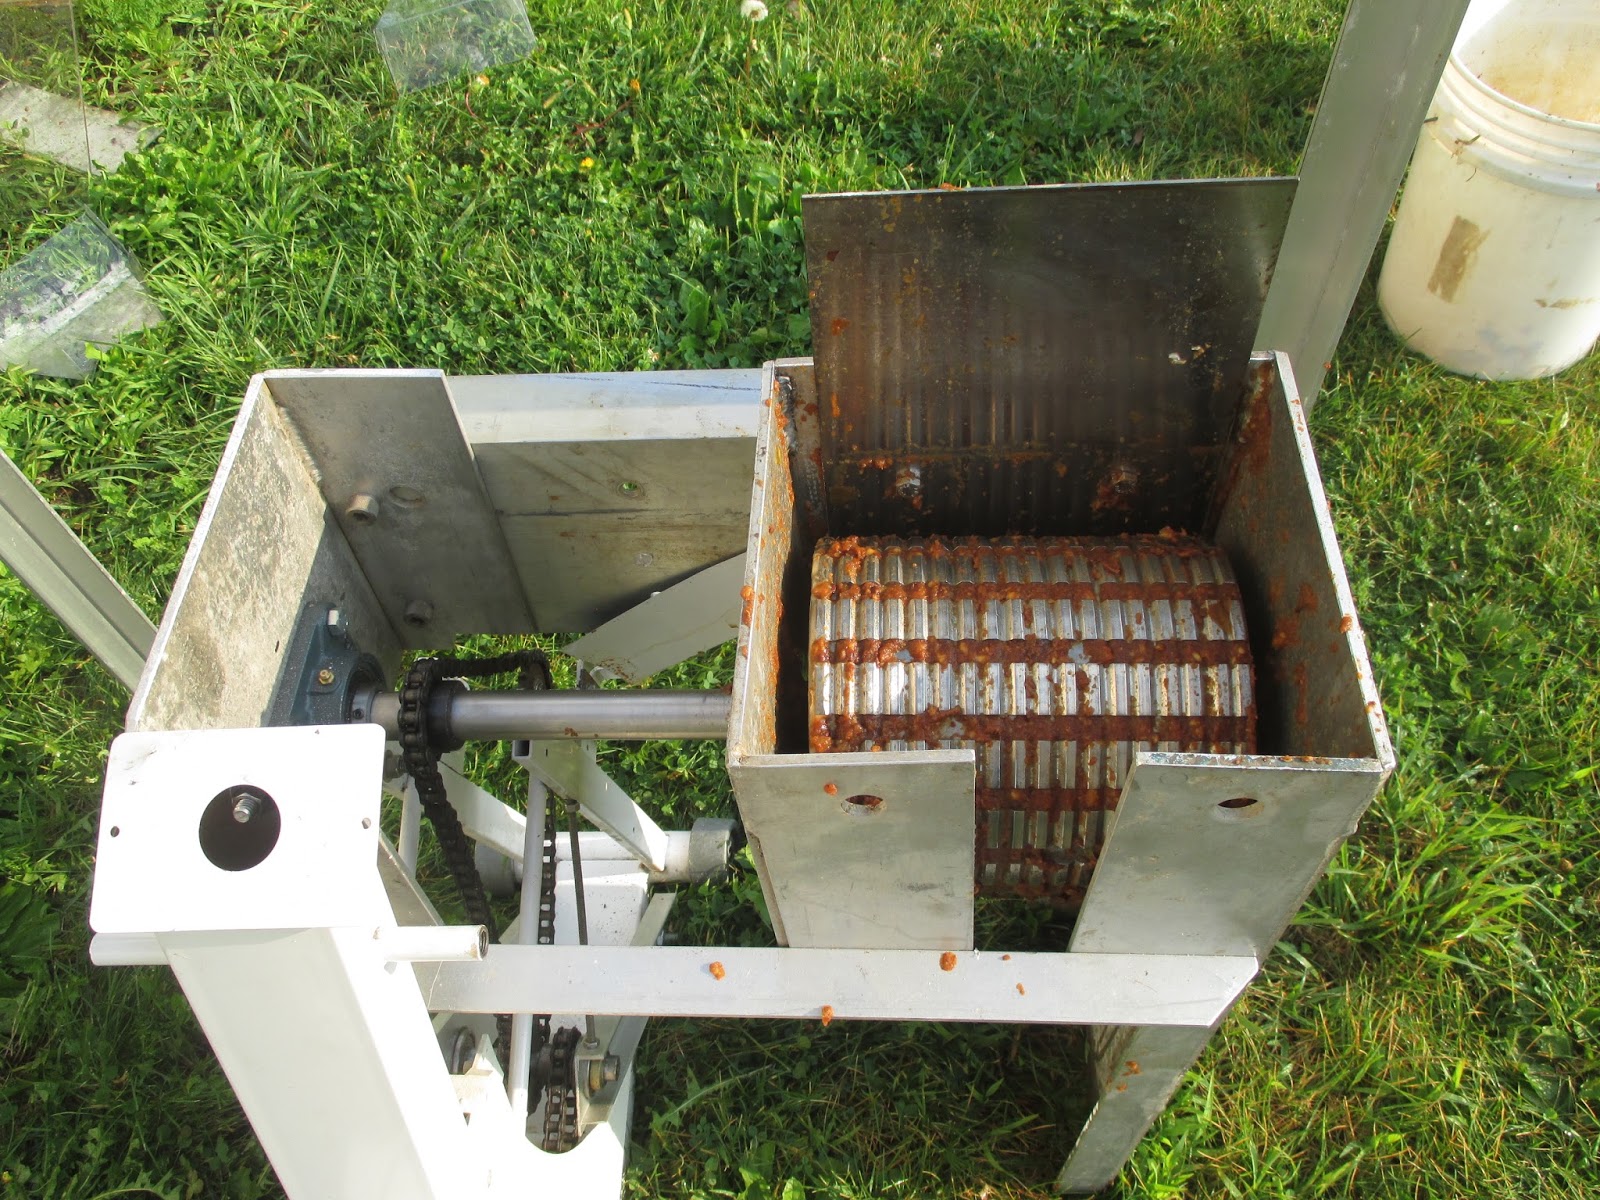
We pick our plum tomatoes once a week and store them for a few days to insure they fully ripen before we give them away or grind them through our 40 year old Squeezo food processor. It took a good part of two days to transform last week’s 240 pounds (Figure 2) into 17 quarts of very thick tomato sauce and seven quarts of tomato soup stock. Turning the handle drives an auger against a screen that separates pulp and juice from peels and seeds (Figure 3).
Figure 3: Straining Tomatoes Through a "Squeezo" Food Processor
 The latter we feed the chickens (Figure 4) and the liquids become soup stock and tomato sauce that is as thick as canned tomato paste. Since we already have more than 120 quarts of soup stock in the pantry, we now only preserve flavorful variations that include spices and other produce. Earlier in the summer we canned spicy sweet corn salsa that also produced many jars of flavorful stock. This year canning clear yellow tomato plasma isn’t worth the work.

Figure 4: A Chicken Trying Tomato Skin/Seed Mixture
Although 240 pounds of tomatoes produces more than 20 gallons of liquids, this becomes only about four gallons of thick sauce. We’ve found that boiling the thin fluid mixture that flows through the Squeezo separation screen for 20 minutes makes the solids stick together and sink while what we call the “plasma” separates and rises. Floating a colander in the mixture (Figure 5) facilitates ladling out the supernatant yellow fluid so that less than half the initial volume remains in the five gallon pot. 
Figure 5: Tomato "Plasma" Collecting in a Colander Floating in Thickening Sauce
The holes in the colander clog with tomato paste and let in only clear liquid. We add two gallons of the thin fluid mixture a few times, boil and then remove more clear yellow liquid until the pot is over half full of very thick sauce. Turning 16 gallons of this liquid into steam to remove it would take much more time and energy.

In a food processor we chop hands-full of garlic, hot peppers, basil and oregano and add this to the now thickened sauce. To meld flavors, we cook this together for a half hour and then ladle the mixture into jars. Though any canning method would work, for this acidic tomato sauce we use a shallow pan that holds about a gallon of water and is topped by an aluminum disk with holes (Figure 6). 
Figure 6: Rear - Canning Operation with 7 Jars Above Water Ready to be Covered with Top
Front - Finished Jars of Tomato Sauce and Soup Stock
Seven quart jars or up to 10 pint jars can fit on top and are covered by a tall aluminum hat. We start timing 20 minutes and turn down the heat when steam shoots out of two small holes in the top. This energy efficient method is quick and simple. My wife scalded her legs using a pressure canner so we now use this method that has worked well for us for over two decades. 

So the boxes of tomatoes in Figure 1 resulted in 17 Jars of tomato sauce and 7 quarts of bright red soup stock shown in Figure 7. More than 20 gallons of clear tomato "plasma" was discarded.
Figure 7: Left - Tomato Stock, Right: Tomato Sauce from 240 Pounds of Plum Tomatoes
To summarize for our location in upstate New York:
1.      Late March: plant tomato seeds in a small flat;
2.      Late April: transplant 2” seedlings to single 8 oz. containers (we reuse old yoghurt cups);
3.      Late May: transplant 8 dozen 8-12” plants into rows between stakes, two feet apart;
4.      June, July and August: weave 1” wide strips of cloth up, then down each row every week to 10 days,       supporting the tomato vines between the stakes;
5.     September: harvest more than 800 pounds of plum tomatoes and process half, and share the rest with neighbors and a food pantry;
6.      Select 100, or so, perfect fruit, save the seeds (described in a future post); and

8.      October +: remove the stakes and roll up the cloth strips, then mulch the vines so they replenish the soil.