Wednesday, September 30, 2015

Sawing Logs Into Lumber

The Northeastern Woodworkers Association has many special interest groups: some turn bowls, others craft toys, whittle birds, make furniture, create banjos and mill lumber. Their latest newsletter has a more complete list: (http://woodworker.org/nl/oct15.pdf). To support a wood craft education fund, one group annually auctions a large variety of seasoned native lumber that they produce. This wood is milled either from single donated logs or large woodlots with many varieties. I joined the team last week and thoroughly enjoyed learning how a sawyer turns logs into boards. 
Sawyer Setting Up the Sawmill Bed
The Bandsaw, Its Engine, and the Alternator Used to Power the Motors and Hydraulics
The Complete Portable Sawmill
We volunteers wrestled logs to the sawmill, discarded unusable slices cut off logs, and stacked the good lumber on trailers. Three volunteers came in pickups with substantial trailers they used to carry the few tons of new lumber to the Shaker barn. This very old building has a wing where fresh lumber is stacked, each piece separated from the others by "stickers", narrow boards made to optimize air flow, so lumber can dry naturally for two years. The sawyer studies each log for a few minutes to ascertain the best orientation to make the first cut. He then brings the reference side to the top and levels the center of the log by raising the smaller end. Since the bandsaw blade is horizontal, every cut removes a layer off the top of the log. The first slice on every side has one side flat on the bottom with the rest as round as the tree trunk. His objective for these slices that make the round log ever more rectangular is to create flat sides wide enough to make single pieces of useable lumber. Once the log is rectangular, without any bark showing, he cuts the entire width into boards.
The First Cut, With the Flat Bottom Wide Enough to Make Lumber (Note the Sawmill's Name at the Bottom of the Photo)
The Second Cut, With the First Cut Pressed Against Stops That Are Perpendicular to the Bandsaw Blade
The Third Cut Makes a Slice of Lumber That Has Rough Edges and Bark on Both Sides. These are Stacked Off to the Side for Later Processing.
Making the Third Side Flat
Cutting the First Slice Off the Fourth Side
Offcuts That Have Rough Sides
Getting Ready to Make Square Edges on the First Side
This portable sawmill is quite advanced, with controls mounted in front of a seat that travels with the saw. Though the slices have to be handled manually, all manipulation of the heavy log is done by hydraulic pistons that the operator manipulates while seated. Less sophisticated units require the operator to walk along as the saw cuts, logs have to be wrestled into place, manually adjusted and clamped.
View Showing the Sawyer Riding Along with the Saw. Sawdust Is Transported Out the Black Tube on the Left Onto the Ground. The Red Tank Above the Saw Holds Gasoline, the White Tank Has a Soap/Water Solution for Keeping the Bandsaw Blade Free of Sap.
Close-up of Sawyer, the Windrow of Sawdust, and the Stump of One of the Red Oak Trees We Made into Lumber.
The Discard Pile Where We Threw the Pieces that Had Rough Edges
The Bandsaw Blade


The Third and Last Trailer Load of Wood to be Transported to the Drying Barn. This Load Is Primarily 5/4 (1.25 Inch) Thick Red Oak Planks.

The group hires a sawyer who brings his portable sawmill. He gets paid by the board-foot of lumber we make. A board foot is a square foot of lumber that is one inch thick. Most of the 1,200 board feet of lumber we made was 4/4, or one inch thick, though we also made some 3/4, 5/4 and 8/4 (2 inch) pieces. One of my jobs was to measure and record each board as it came off the mill, one page for each log. All our logs were nominally eight feet long, with eight to ten inches extra on each end to allow removal of split ends when this rough-cut lumber is planed after drying for two years. The largest log made over 200 board feet, with the rest between 100 and 200. Altogether, we made over 1,200 board feet in a day that was interrupted by a smoking alternator belt that had to be replaced. It took two hours to obtain the new belt and install it.

The sawyer had to stop cutting two times in order to exchange a dull blade with one he had resharpened. This process took only 20 minutes. The sawmill is an hydraulic Wood-Mizer, Model LT40-H, that the sawyer has used for over a decade. The unit uses a gasoline engine to power both an alternator and the bandsaw that cuts the wood. The alternator charges a battery that powers quite a few motors and a hydraulic pump that operates six functions: log feeding, two opposing log clamp systems, log rotation, and near/far log leveling. 

Thursday, September 24, 2015

Glazed the Greenhouse!

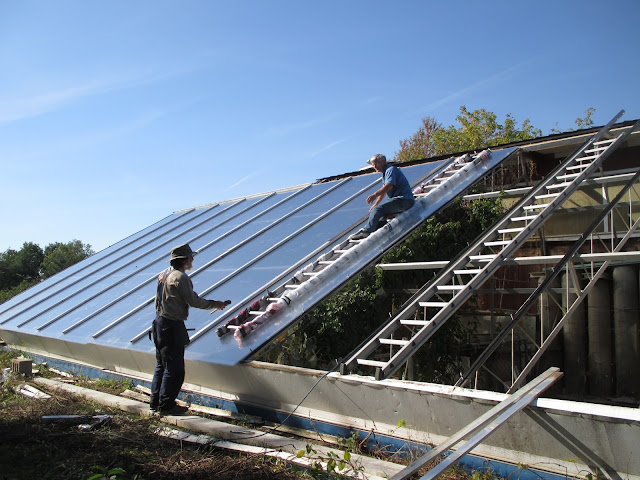
It took a whole day to install three 4' x 20' panels. These new panels are a bit wider than the ones they are replacing and we had to figure out how we would accommodate these different dimensions. The aluminum trusses are rigidly mounted to horizontal members that fix the 48" center-on-center distances. The previous panels were 47.5 inches wide so squeezing in panels a bit wider required some work-arounds.
Capping the Connection Between the First and Second Panel on the Left Getting Ready to Install the Third and Fourth Panels on the Right
A major change between the original installations of the old panels and these new panels is that aluminum extrusions that captured the 20 foot sides of each panel had 3/8 inch studs projecting above the cap. These prevented snow from sliding  down easily and also interfered with efforts to shovel off snow. This new approach hides the nuts between a lower extrusion with legs up under a second extrusion with legs down. The two are bonded together with screws on the side, through the legs, leaving the top smooth.
This Installation Required Two Ladders: One on the Right Used to Carry the Glazing Panel Up the Incline, Allowed Removing the Top and Bottom Protective Layers, and Enabled Drilling Holes Through the Right Side of Each Panel to Permit the Studs to Capture That Side. The Ladder on the Left, Protected by Soft Material, Allowed Installing the Capture and Cap Extrusions. This Photo Shows Them in Position for Installing the Tenth Panel.
By 2PM today, we had installed over half the panels. Each one became easier than the one before.
End of Day Two: 12 Panels Installed. Some Cosmetic Details Still Need Addressing - But We Have All October to Complete These: The Greenhouse Is Safe From Frosty Nights! 
By 5PM we had installed the 12th panel and although there are quite a few details to complete, the greenhouse is safe from harsh weather and frost. Closing off the tops and bottoms of the panels are tasks I can complete alone, while carrying and installing the unwieldy panels required two people. Luckily, my brother Bob was able to help install the twelve panels.

Tuesday, September 22, 2015

Jalapeño Pepper Jelly!

A Few Pounds of Hot Peppers
Someone I follow on Twitter posted a recipe for an interesting Cranberry-Pepper Jelly (Hot). A most interesting aspect: suspending a whole pepper in each jar of clear red jelly! But the recipe had one problem: it only made three half pint jars. I like to fill our vessel when canning to save energy and also make the work worthwhile. Why make three when it's just as easy to make 15 jars?
15 Jars of Hot Jalapeño Pepper Jelly
Two Quarts of Currant Juice
We have a bumper crop of hot peppers so collecting enough for this recipe was easy. I selected 16 bright red peppers that were too big to fit the small canning jars and chopped them, seeds and all, in our food processor. I added the mash to two quarts of currant juice that we canned a few months ago because currants are tart and red as cranberries and I didn't have to go to a store and get cranberry juice cocktail. After adding 12 ounces of homemade apple cider I simmered it for 15 minutes before straining out the pepper bits. To the now clear liquid I added 10 cups of sugar, two packages of SureJell Fruit Pectin (@1.75 oz.) and a bunch of pretty ripe peppers. 
Making Jalapeño Jelly by Sterilizing Whole Peppers in the Currant Juice/ Sugar Mixture
After boiling the mixture for 15 minutes, I filled 16 jars and stacked them in the steam canner. After steaming for 15 minutes, I tightened the rings on their tops and let them cool. All tops "popped" indicating they are vacuum sealed.
Jars, Filled With Jelly and Pepper, Ready to Be Steamed
The remaining peppers will soon be processed using another recipe I came across: Cowboy Candy (Candied Jalapeños). The Currant/Jalapeño Jelly jelled within ten minutes and tastes terrific! Not too hot, but very exciting!

Peppers That Didn't Make It Into the Jelly
Currant/Jalapeño Jelly Recipe:
32, or so, Jalapeño Peppers
2 Quarts of Currant Juice (or Cranberry Juice Cocktail)
1.5 Cups Apple Cider Vinegar
10 Cups Sugar
2 Packages of SureJell Fruit Pectin (or other jelling agent)

1. Chop the ugly half of the peppers in a food processor (or by hand), with or without seeds (that have most of the heat). 

2. Boil chopped peppers in the juice/cider mixture for 15 minutes and then separate using a strainer.

3. Add the sugar and pectin and when dissolved, add the good looking peppers, and cook for 15 minutes.

4. Ladle into jelly jars with one pepper in each, tip up (so stem doesn't get under the lid seal).

5. Steam for 15 minutes with lid rings loose.

6. Tighten the rings while hot to create the vacuum that "pops" the lids.

7. Label, with date.

Monday, September 21, 2015

Butternut Squash Harvest: Part 1

Our favorite vegetable during the winter is butternut squash. Some keep a whole twelve months in our basement, no refrigeration, caning or processing needed. We usually peel them, remove the seeds, cut them into one inch square pieces, and steam them until they are easily mashed. The seeds make a great snack when tossed with spices and roasted, or they, along with the peels make interesting food for chickens. 
First 2015 Harvest of Butternut Squash: 679 Pounds!
This year I grew more than usual, planting them outside the fence along the length of the upper garden and one row inside the lower garden next to the sweet corn. We encourage the vines to climb on fences, corn stalks and other plants so that the fruit grows cleanly. We also urge the vines to spread into the lawn because there squash fruit don't get as muddy as those that mature on top of grass mulch. The vines started dying a few weeks ago so today I harvested those who were mature, totaling 679 pounds. There are probably another 150 pounds of less mature fruit, that are pale and have green stripes running down necks. Most of these younger ones still have vines with green leaves so should continue maturing to a rich, more orange color. There is no hint of frost in the 10-day forecast so it's worth given them a chance to lock in more sugars.


Saturday, September 19, 2015

Greenhouse Glazing Update

I ordered new polycarbonate glazing a week ago and it arrived yesterday! I thought it would take much longer since the panels had to be cut to length, put in a crate built just for the 12 panels, and shipped from Wisconsin to where I live near the New York/Vermont/Massachusetts junction. It arrived in a tractor/trailer and the driver was in a hurry. He wouldn't allow me to open the crate and unload the panels one by one. The crate weighed over 1,100 pounds and the two of us couldn't move it so he had me get our tractor and a chain to pull it out the back of the trailer. It took only a few minutes though the back end of the crate had to sustain a few drops as it fell first to the bumper halfway down, and then to the ground. The crate is extremely well packed and the panels were oriented on their edges so they are probably fine.
Pulling the 21 Foot Long Crate Out of the Trailer
Glazing Panel Crate on the Ground, Without Tipping Over!
Now I Have Time to Uncrate! The Truck Is Leaving.
The cross section of these panels is much more complex than those they are replacing. They have five parallel layers that also have "XXXXXs" across the length, see photo below. This makes them stronger but also adds material that sunlight must pass through so they block a bit more than three parallel layers. This 20mm Clear Lexan Thermoclear Plus 2UV 5-wall X-structure material has an ultraviolet blocking compound on both sides so that it can be flipped over without sacrificing service life. The salesperson promised that each side should weather well for 20 years so I shouldn't have to purchase new glazing for 40 years! I won't be holding my breath!
End View of an Old Glazing Panel

End View of a New Glazing Panel
Installation instructions recommend that the top end of each panel be sealed with an impermeable tape and the bottom end covered with tape that lets the inside channels breathe and allows any moisture to drain. I'll use a metal tape for the top and a cloth tape for the bottom. 

Thursday, September 17, 2015

Bean and Pepper Harvest

We grow pole or runner beans because they climb up on fences, poles or other structures created to keep them up in the air. We like the colorful flowers of Scarlet Runner Beans but their seeds are pretty tough and take many hours of simmering to soften. So we also plant a white-colored bean that cooks more quickly.
Scarlet Runner Beans with Flowers, Immature Beans and Tan Dry Pods
Woodchucks and rabbits seem to ignore the tough stems near the ground and the tender tendrils, flowers and developing beans are out of their reach. Some birds like cutting off tender pods or teasing out mature seeds - but not enough to diminish harvests too much.
The pods of bush beans often lie directly on the soil and deteriorate it they remain wet for very long. Because we mulch quite heavily, the soil is usually moist that leads to the pods and the seeds inside molding before they dry. Slugs and snails also attack fruit near the ground much more than those high up in the air. 

Second Harvest of Dry Scarlet Runners: 4.5 Pounds of Shelled Beans.
We eat quite a few meals of the tender green beans but most we let mature and dry. When their pods become brown, we periodically pick and shell them, letting the fancy beans dry completely in shallow baskets store against the ceiling above the wood stove. We like to harvest the dry beans every two weeks, or so, to prevent a flock of birds from stealing them. When a single bird figures out that there are nutritious beans inside the innocuous pods, it takes only hour or days for them to shred them all. We're lucky that most years they don't figure it out.
Third Harvest of Scarlet Runners: Six Pounds of Dry Beans
Sweet peppers mature much faster than hot peppers. Of the five types of sweet peppers, we like the large orange and red types the most because they are meaty and sweet. The purple ones are thin and even when mature, taste very much like mild immature green peppers. Small bright yellow ones son't have much taste and this year they are spongy. Other years these small yellow peppers were our favorite because they mature very early and continue producing into October when other varieties crashed. And critters seem to leave them alone. Many of our larger peppers are nibbled by rabbits, mice and voles, often making holes to access the seeds inside the fruit. Daily harvesting catches damaged fruit so to minimize waste we simply trim away nibble marks and eat them in the next salad or stir fry.

Variety of Peppers, Tomatoes, Squash and Eggplant Waiting to Be Eaten. When the Stove Is Not Being Used for Heat, It Makes a Great Table!

Friday, September 11, 2015

Bottling Hard Cider

I finally got around to bottling last year's cider that has been resting in the basement for almost a year. To five gallons, I added 24 ounces of maple syrup before bottling it in 40 flip-top bottles. The most significant work involved washing and sterilizing the glass, removing and scrubbing the rubber washers and then reinstalling them. These bottles have been in storage for years, having come across them, empty, at a large event that featured European beers.
Forty 16 Ounce Bottles of 2014 Hard Cider Ready for Final Fermentation. Extra Empty Bottles on the Counter Behind.

In a few weeks, it'll be time to pasteurize them so they maintain a bit of sweetness and don't explode from too much carbonation. The 6.5 gallon brewing bucket is now ready for this year's second batch.

Monday, September 7, 2015

Peppers!

We're having the best harvest ever of both hot and sweet peppers. Five varieties of both sweet and hots are planted in beds separated by a few hundred feet so bees don't transfer hot genes to seeds developed by sweet varieties. Though we usually grow out specific varieties completely isolated from other peppers and have thousands of seeds stored in our freezer that were harvested this way, we'll save some of this year's seeds taken from the most healthy fruit for good measure. Some variety crossover may yield some that grow even better in our neighborhood!

Mix of Ripe Sweet Peppers
We planted more than twelve dozen each of the not too hots and the sweets for variety and to insure that we get at least some hot and sweet for eating. So far, every variety is producing well with very little insect damage: Tangerine, Orange, Mexican Red, Purple Beauty and Yellow Round that are mild and sweet, and Serrano, Jalapeño, Alice's Favorite, Poblano and Shishito that are mildly hot peppers. We used to grow a few colors of Habanero peppers but they were too hot for most people. One batch of salsa even caused one challenger in a hot salsa eating contest to drop unconscious!

Sweet Peppers Sorted by Color
Alice's Favorite Hot Peppers
Serrano Hot Peppers

Saturday, September 5, 2015

Preparing to Reglaze the Greenhouse

Thirty years ago we erected a greenhouse on the south side of our shop building. It has 12 triple thickness polycarbonate panels that are four feet wide and 20 feet long. Their projected life was 20-25 years and they definitely showing their age. Eight years ago I had flipped them all upside down because hail had penetrated the top layer or two so that there were 25-50 holes in each panel. Snow that flowed into these openings froze preventing sheets of snow from sliding down the glazing.
First Glazing Panel Removed from Greenhouse.
It's really important to warm the greenhouse with as much winter sunlight as possible to keep everything inside from freezing. Snow has to be removed. It didn't take too many shoveling sessions in windy, freezing conditions to convince me that the work involved to put the smooth bottom glazing layers on top was worth it. This greatly reduced the amount of snow shoveling but the snow that piled up at the base of the greenhouse still had to be removed to allow more snow to slide down the glazing.
Four Panels to Go!
Another hail storm last year poked 15 to 30 holes in each of the flipped panels and these would impede snow from sliding down this winter. As you can see from the photos, the glazing is very yellow/opaque and probably lets less than 50% of the sunlight penetrate. That is okay for lettuce but not vegetables that need to grow large enough to plant outdoors in late spring. The glazing has also become quite fragile and had to be patched where flying debris broke holes through it.
Glazing Panel Repaired by Laminating a Clear PC Layer Behind.
So now we are in a race against the first frost: will the new panels arrive in time to install them before the first frost?

Last Panel!

All Panels removed!

View Showing Supports at 1/3 and 2/3 Positions Along Panel Length That Prevent Snow Loads from Bowing the Panels Too Much. A New and Improved Panel Option May Allow Eliminating These Supports.

Wednesday, September 2, 2015

Processing Tomatoes

We grow almost 200 tomato plants in two separate gardens. This year we are trying six varieties and not saving tomato seeds so each section has more than one variety. When we save seeds, we grow only a few types and isolate each variety to keep the seed pure and less likely crossing with another. This time of year this many plants deliver a few bushels of ripe fruit each week that we share with family, friends and neighbors. We also deliver 40 to 100 pounds each week to a local shelter.
The "Squeezo" Separates Tomato Skins and Seeds from Pulp and Juice. We Put the Skins and Seeds Through Twice to Maximize Yield and Dry the Dregs for the Chickens.
Hand Cranked Food Processor with Interested Dog, Cupcake.
This week was our turn to process ripe tomatoes. We separate the juice and pulp from the seeds and skin using the same "Squeezo" food processor that we use for apples. We add lots of garlic, basil, oregano, and hot peppers (Serrano this time) and let boil for half an hour. 
Tomatillos, Serrano and Sweet Peppers We Added to Flavor the Tomatoes
On top of the bubbling puree we then float a metal colander with small holes so we can ladle out most of the clear liquid. We preserve this in quart jars for soup stock that we use to reconstitute dry beans during cold months. It takes three or four quarts to make a large pot of soup using a pound each of dry beans and frozen sweet corn. We usually add hot turkey sausage and any fresh vegetables available. The wood stove in the kitchen is hot or warm from October to April since it heats our home so it's no trouble to slowly cook soup for eight hours, or so, every week. 
Metal Colander Floating on Top of Cooking Tomato Sauce That Facilitates Ladling Out Tomato Plasma to Thicken It.
Tomatoes processed this way make twice as much soup stock (flavored tomato plasma) as it does thick sauce that we use for pasta or pizza.

Day One: Nine Quarts of Thick Tomato Sauce and 19 Quarts of Soup Stock, That Have Various Amounts of Tomato/Flavoring Solids. Fewer Bits and Pieces Go Through the Holes in the Colander As the Sauce Thickens. 
Day Two: Five Quarts and One Pint of Tomato Sauce, 11 Quarts of Soup Stock On Top of the Stove We'll Use for Cooking All Winter.