Sunday, May 22, 2016

Protecting Eggplants

Last year the only eggplants that survived and produced fruit lived in the greenhouse. Flea beetles killed those planted outdoors. The year before those protected with floating row covers did well so this year we are using more elaborate tents to prevent flea beetles from finding them.

Since the spun fabric is seven feet wide, we made a four foot wide aluminum frame of 3/8 inch diameter aluminum rods suspended about a foot above the ground. Seams along both sides and ends captures more aluminum rod and can be stapled to the ground if weight and mulch are not able to keep the edges tight enough against the ground to keep flea beetles out.
Well Mulched Eggplants About to be Covered with Fabric

First Tent with 28 Eggplants Inside with 30 Still Needing Protection

Sunday, May 15, 2016

Time for Planting Seedlings

Although it may freeze tonight, some seedlings can tolerate cold nights. Over the past two days I planted our five types of sprouted onions and later today will start setting out cabbages, Brussel sprouts and kale. Later this week should warm up enough to set out tomatoes, eggplant and peppers.
Flower and Vegetable Seedlings Waiting for Warmer Weather Before Growing Outdoors

More Then 100 Tomato Plants Fit in a Small Area

The newsprint tube seedling holders is working out very well: No winding up of roots at the bottom and they make it very easy to transplant seedlings. They readily slide out of their containers and do not stick together. Many of the onion tubes had more than the optimal three plants and were easy to separate into groups of two or three. Roots were not tangled and readily pulled apart, a chore that was impossible with shorter vessels without breaking rootlets. The tubes that had two or three layers of newsprint were too robust and resisted tearing down their entire length.  Removing the newsprint and adding it to the surrounding mulch seemed appropriate to prevent it from impeding root growth. A single layer with overlap for glue proved most appropriate.
Onion Sprouts Ready for Planting
Onions Planted in Mulch, Garlic Behind

Closeup of Some Onions

Directly Seeded Sugar-snap Peas Growing Well

Saturday, May 14, 2016

Grass for Mulch

We have a few acres of fields that I mow in spring and early summer for garden mulch. After July they simply grow untended except for a few paths that help us avoid ticks, burrs and wet shoes. The first cutting in spring is substantial because it includes both early new growth and plants that died over winter.

Because dry plant matter is easy to handle, works better as mulch than wet grass that heats up and decays within a few hours, and can be used to cover sensitive plantings if frost threatens, I initially mow fields a few sunny days before picking it up. This year our first harvest of mulch delivered four trailers full plus over 100 bags (the bagging feature of the mower fills three at a time) all together totaling over 30 cubic yards of mulch. 
Diesel Tractor Connected to a Trailer That Catches Dry Grass Delivered by the Mower Via an Articulated Tube
Tractor with Bagging System

Filling the trailer behind the mower requires the grass to travel more than ten feet through a large articulated tube that only works well with dry matter easily transported by the blower. Wet material clogs the system. This combination of tractor/mower and trailer connected by a tube requires a large turning radius so it can only be used by proceeding clockwise around two large fields. Filling the trailer that fits about 40 bags of mulch is a huge time and fuel saver because it avoids so many back-and-forth trips to garden plots. For a few years I emptied the bags into the conveniently located trailer but then emptying the trailer required removing the bagging system. And it's a lot of work emptying bags every five minutes, the time it takes to fill them. The trailer sides and top are now lined with mesh that catches the mulch thrown by the hurricane of air that transports it from the mower. It now takes less than a day to pick up the four trailers and 100 bags of mulch that used to take many days.

View Showing Dry Grass Surrounded by Field Where Mulch Has Been Picked Up
Mulch Ready for Distributing Around Garden
Worth noting: last year's mulch has essentially disappeared by this time and gardens are bare soil except for corn stalks, tomato vines and pepper skeletons from the crops themselves. The nutrients in the mulch have been processed into the soil by worms, bacteria and fungi.

Hours driving around fields are not boring. There are dozens of birds to watch, baby rabbits, snakes and frogs to avoid, and other wonders to ponder. The fields have animal paths crossing them and often matted grass that show where deer bedded. Once in awhile I have to escort a newborn fawn from harms way for they refuse to move on their own. 
Belle, Our Dog, Sitting on a Deer Path Through Our Harvested Field. Their Hooves Trim the Dead Grass To Allow New Grass to Grow More Vigorously Than the Rest.

Monday, April 18, 2016

Newspaper Plant Pot Experiment

For many years I've used thousands of 6 and 8 ounce yoghurt cups and dozens of plastic vacuum-formed seedling trays to grow out seedlings. They work but both are too short (less than 3 inches): roots soon hit the bottom where they wind round and round and tangle. Stretching roots out when transplanting damages them, slowing growth. Though it's easy to remove plants from the separate yoghurt cups, only 24 fit in common flats (10.5" x 21"). Many more plants fit in the seedling trays (72) but it is challenging to remove them one by one without damaging tender roots and stems. A better system would not require removing young plants from their container that would dissolve into the soil.
Flat with 24 Each 6 or 8 Ounce Yoghurt Containers: They Take Too Much Space!
Bottom View: Plastic Seedling Tray with 72 Positions (2.4" Tall)
Top View: Seedling Tray
A sophisticated Japanese system uses paper honeycombs that enable seeds to grow to an appropriate size and then flats are automatically planted very rapidly, with each plant appropriately spaced without removing the paper. But these are suitable for high volume closely spaced salad growers, not for larger plants or flowers. There are also systems for forming paper cups using newspaper but these are typically less than 3 inches tall. I wanted tubes closer to 6 inches tall. 

After trying a few diameters and lengths, I settled on paper tubes wrapped around a short length of 1.5 inch PVC pipe (1.625" OD) because three rows of three tubes fit nicely inside tall square plastic flower pots. Eight of these pots, with nine paper tubes in each fit perfectly in a flat, the same number, 72, as the seedling trays. Each tube holds the same amount of growing medium as an eight ounce yoghurt cup but takes up one-third the space. 
White Glue Used to Form Newspaper (5.5" x 7") Into Tubes (Around 1.5" PVC Pipe)
Basket and Trug Filled with Paper Tubes
Tray Holding Eight Square Plastic Pots That Hold Nine Paper Tubes Each
Tube-Filling Process - 50:50 Seed Starting Medium:Composted Manure 
Seed Sprouting Operation
Planting Tomato Seedlings: One Per Tube
Flat Transport System to Greenhouse
Paper Tube Growing Experiments: Five Types of Onions, Cabbages, Flowers and Tomatoes 
Peppers Growing in Yoghurt Cups
Above: Flowers Growing in Various Shallow Cups; Below: Lettuce and Parsley
If these paper tubes filled with growing medium and a seedling are easy to plant, and the onions, cabbage and tomatoes grow without hesitation, this new technique will take over the messy yoghurt container system. They have been deteriorating for years and take time to collect, clean and store. The space they take growing limits how many plants we can fit in the greenhouse. We'll be able to fit three times as many using the paper tubes! I can make a few hundred during a typical DVD, fewer if there are subtitles I have to read!

Sunday, April 10, 2016

Renewing the Chicken Tractor Roof

Every few years we have to replace the tarp that covers the snug side of the chicken tractor. We live on a hill that has few trees or structures to block wind that shreds any loose fabric, especially if there is something hard or sharp to rub against. The structure of the pen consists of aluminum angles that are fairly smooth but holes appear even where fabric rubs these. This time I used the old and holy tarps to cushion the new tarp where it hits the rafters in hopes that it will extend its life another few years.
Shredded Tarp That Lasted Only Two Years on the Roof of the Chicken Tractor

I sewed pockets on the four edges of the tarp to capture aluminum rods that make it easy to stretch it over the top. Then only the eight ends of the rods need be fixed to the frame and there is no loose fabric to flap and wear out. This roof not only keeps our chickens and guinea fowl dry and cozy, it prevents predators from seeing them. The other side of the pen is covered with fencing both to keep our birds inside and other critters outside.
Chicken Tractor Without Roof

Inside View Showing Nesting Boxes and Roosting Shelf, Upper Left

View Opposite Photo #2 Showing Wear Pattern Against Nesting Boxes

Tarp Wearing Through Where It Rubs on Metal Corners But the Nesting Boxes Are Backed by Metal

Chicken Tractor with New Roof, Ready for Birds!


Monday, April 4, 2016

Seedling Freeze Emergency

It's April 4 and we are having the biggest snowstorm of the year! This would be great for skiing cross country (which we haven't been able to do yet this winter!) but the accompanying cold weather is threatening our pepper and eggplant seedlings. Our greenhouse has not cooled below 45 degrees for weeks and our flats of sensitive plants there are thriving. But tonight it's heading well below 20 degrees and with the greenhouse temperature just below 40 degrees at  noon, we could lose many hundreds of peppers and eggplants. It would take six to eight weeks to grow replacements!
Over 300 Pepper and Eggplant Seedlings Growing Above Beds of Lettuce and Parsley
With outdoor temperatures now hovering near 20 degrees it would be very difficult to move these sensitive plants back into our warm house, 300 feet away. So we needed to add some heat. The flats of seedlings ride on a long beam so a member suspended above the flats can support both lights and a plastic film tent. Inside the tent, fluorescent and LED lights should add enough heat to keep the plants from freezing.
A Slender Member Suspended from the Rafters Supports A Fluorescent and LED Light 
Wrapping Plastic Around the Member and Plants Should Keep the Baby Plants Warm
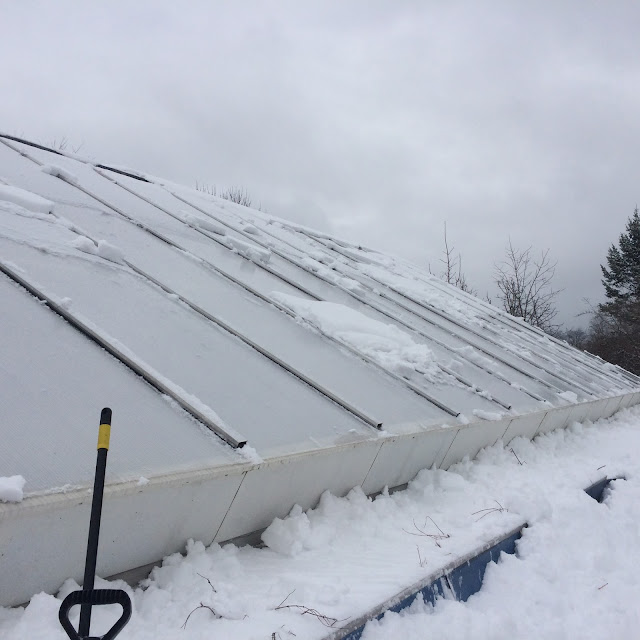
Shoveling away the pile of snow that developed at the base of the greenhouse glazing allowed most of the rest of the snow to slide down, opening the glazing to the sky. Even though it continued snowing all afternoon, the temperature inside the greenhouse went up a few degrees.
Snow Piling Up at the Base Keeps the Rest of the Snow from Sliding 

Shoveling Away the Piles at the Base Allows Most of the Snow to Slide Down, Opening the Glazing to the Sky

Tuesday, March 15, 2016

Maple Syrup and Working Wood

February and early March weather spurred maple trees to produce large amounts of sap. Five tapped trees produced 14 quarts of maple syrup so far but are tapering off. Our stove has been covered with steaming pots for the duration and we're looking forward to a cooler kitchen, without so much steam.
A Pot of Soup Shares the Stove Top with Five Pots of Maple Sap
Although gathering sap, feeding the fire, tending pots on the stove and insuring syrup does not become charcoal takes time, there were a few hours in between to complete woodworking tasks. I've been learning skills at Northeastern Woodworkers Association classes and the organization expects each member to contribute an object to be sold at the NWA Showcase being held in Saratoga, NY on April 2&3: 

http://www.nwawoodworkingshow.org/information.htm 

It's the largest woodworking show in the country and this is the 25th anniversary show and should be the most extravagant. In addition to the garden tote with white ash ends that will be on sale to benefit the club, I made another out of cherry to be on display in the flat-board section along with instruments, furniture, chests and fancy boxes. I have yet to complete a bowl for display in the wood-turners section. 

The organization supports many non-profit and other benefit efforts and I volunteered to make a vessel to hold "beads of courage" for some very sick child. These colorful beads are given kids when they undergo a procedure like drawing blood, getting imaged, receiving chemo or radiation treatment and shots. Many kids "earn" thousands of beads and need something to put them in. Some of the members made square boxes and others turned cylindrical vessels out of wood. I decided to encase a large plastic jar in wood with lots of open areas to view the beads inside. 

For more information see: http://www.beadsofcourage.org/

Bead Vessel: Top & Bottom Are Walnut, Knob Is Lilac
Horses Are Soft Maple, Poles Are Birch
Garden Tote: Ends Are White Ash, Sides Are Cherry, Handle Is a Hickory Stem and Woven Nylon-Coated Stainless Steel Cable Bottom 
Side View of Above Tote
End View of Above Tote
All Cherry Tote with a Cottonwood Handle Peeled by a Beaver
End View of Above Tote