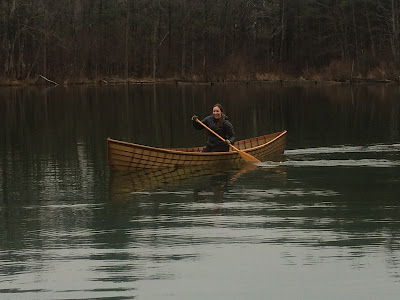
Cape Falcon Kayak described making Adirondack guide boats and reminded me of time I spent in the Adirondacks, hiking as a teenager and later canoeing there through a chain of lakes.
Skin-on-frame guide boats made by
Brian Schulz at Cape Falcon Kayak
Before roads, wood planked versions of these boats were "pickup trucks" of the Adirondack region.
Fifty years ago I paddled a robust aluminum canoe many miles in both New York state and British Columbia, Canada. Though rugged and functional, this kind of canoe is awkward, loud and heavy. Searching for a lighter, quieter craft and that I could make myself, skin-on-frame canoes stood out. But rowing is more efficient and promotes fishing. Guide boats are essentially canoes that you row (or paddle).
Building one involves making a bottom board, two stems and two gunwales with ribs between them to establish shape. Stringers on each side then support the nylon fabric stretched over the frame that is then coated to make the boat float. Tiny decks are added to the bow and stern for hand holds or for sitting on when launching and landing. Installing seats and making oars complete construction.
Dimensions in this 14 foot boat scaled the 16 foot
data published in The Adirondack Guide-Boat
by Kenneth and Helen Durant.
Discarded redwood paneling (3/4x8 inches x 8 feet),
painted white on one side provided the wood for
the bottom, stems, ribs, gunwales, stringers and
decks. Redwood is lightweight, rot resistant but
not able to take very high forces.
A dead ash tree milled by volunteers from the Northeast
Woodworkers Association provided wood for
the seat frames and other high stress parts.
Joining then milling to half inch thickness, two
redwood boards scarfed together make the
bottom. Perpendicular grooves establish the
27 rib locations.
Plastic templates were made for the stem, above,
and the ribs, then reproduced in redwood.
Eight thin slices of redwood were laminated
together to make a double rib, that was split
in half to make front and rear ribs.
There are ten different rib patterns.
Each 3/4 inch wide rib was split in two to
populate front and back halves of the boat.
The central nine ribs are identical: from five double
ribs cut in half. To prevent the ribs from delaminating
when bumping into rocks, they were wrapped with
50 pound braided fishing line and then varnished.
Too thin for screws, lashing and adhesive
connect ribs to the bottom board.
Most of the ribs in place.
Three sets of two eight foot boards were scarfed together
to make gunwales, the long pieces that top the ribs and
establish the shape. This process also made an extra set
for another boat (to insure the assembly stays straight).
The fourteen foot gunwales needed a six inch
chord to establish the proper curve.
Waiting for the glue to cure.

The actual chord dimension and also showing
the three layers that make up the gunwales.
Length of three laminated boards, good for four gunwales.
Lashing a gunwale to ribs.
Both gunwales in place. Extra lengths
of ribs were trimmed off.
Stringers that support the fabric were scarfed, glued,
sanded and varnished before lashing them to the ribs
evenly spaced between the gunwales and bottom board.
Showing a stringer connection to a stem,
the curved boards at each end of the boat.
The completed frame.
To this point, work was done with the frame upright.
In order to attach the skin, the frame needed
to be upside down.
to gunwale.The 14 foot long edges were first stapled
on each side, then sandwiched between redwood
gunwale and an added ash outwale (for strength
for bumping docks and to support oarlocks).
Hand stitching each end a bit to the side insured
that the hem didn't interfere with the brass
rub strip added after coating the fabric.
The wrinkly fabric was then soaked with hot water
and drying stretched out the wrinkles.
A dark color acid dye was applied to make
the boat a more appropriate color but it
left splotches and streaks.
of two part polyurethane resin to hide stains
of the previous effort.
At this point the boat weighs 34 pounds!
Adding decks, oarlocks, brass rub strips
and seats added six pounds.
On the day before our pond froze in December,
we made sure the boat didn't leak!
But we had to paddle because there were
no seats, oarlocks or oars yet!
seat that include holes for caning.
Woven continuous strips of wet rawhide
populate frames instead of caning.
It takes only an hour to cut rawhide into
strips, soak one and then weave it around
each seat frame.
There are identical decks at each end that provide
handholds to pick up and carry the boat.
Deck support structures are made from ash to
withstand the forces involved in sitting
on a deck or carrying a loaded boat.
Redwood planks finish the decks. This photo also shows an end
of the brass rub strip that runs from around the bow stem,
along the ash keel on the bottom and around the stern stem.
perpendicular to the water. Since screws in the redwood
gunwales to attach oarlocks would probably work loose
over time, I used bolts with a backing plate against
an ash wedge to present a parallel face.
from a dead white pine tree.
A second oar copied the first.
two oars and two sets of oarlocks.


The finished boat looks amazing!
ReplyDeleteViewed your boat at the wood workers show. Nice job.
ReplyDelete